
Poor neglected blog.
It’s been an incredibly busy year so far…it’s not often my year starts when there is still turkey leftovers in the fridge from Christmas, but this year just won’t quit.
Todd and I have been chatting about ideas for posts based on emailed question we’ve had so it’s still going on. He is up to his neck in Shrek (not literally….that would be pretty unpleasant) but as we speak the finish line is in sight for him so we will be grabbing those mics pretty soon and getting to it.
In the meantime, I thought I thought I would show some behind scenes stuff from a TV show I did a while back with some help of David brown, an excellent FX guy who I have known for a few years now.
David is one of those talents who has skill, technical ability and a fantastic work ethic with huge amounts of determination and a realistic assessment of situations. It made my life a lot easier having him around. Thanks, David!
The Job

Things are not all as they would seem aboard The Beagle.
It was a comedy sketch show called ‘It’s Kevin’ which I got through the excellent FX guy Waldo Mason, who has a string of credits and a stunning portfolio to make your eyes water.
The work was for makeup designer, the lovely Sarah Jane Hills was makeup designer on some of the most well-known UK comedy shows such as Peep Show and The Inbetweeners.
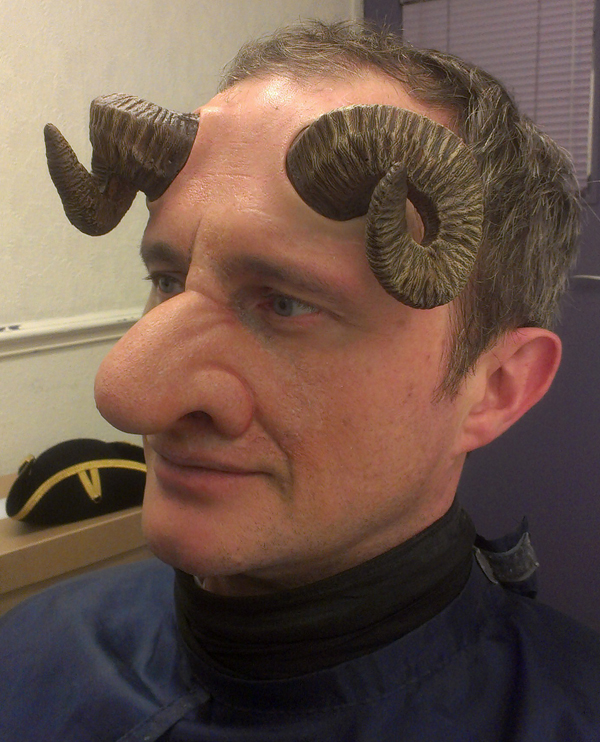
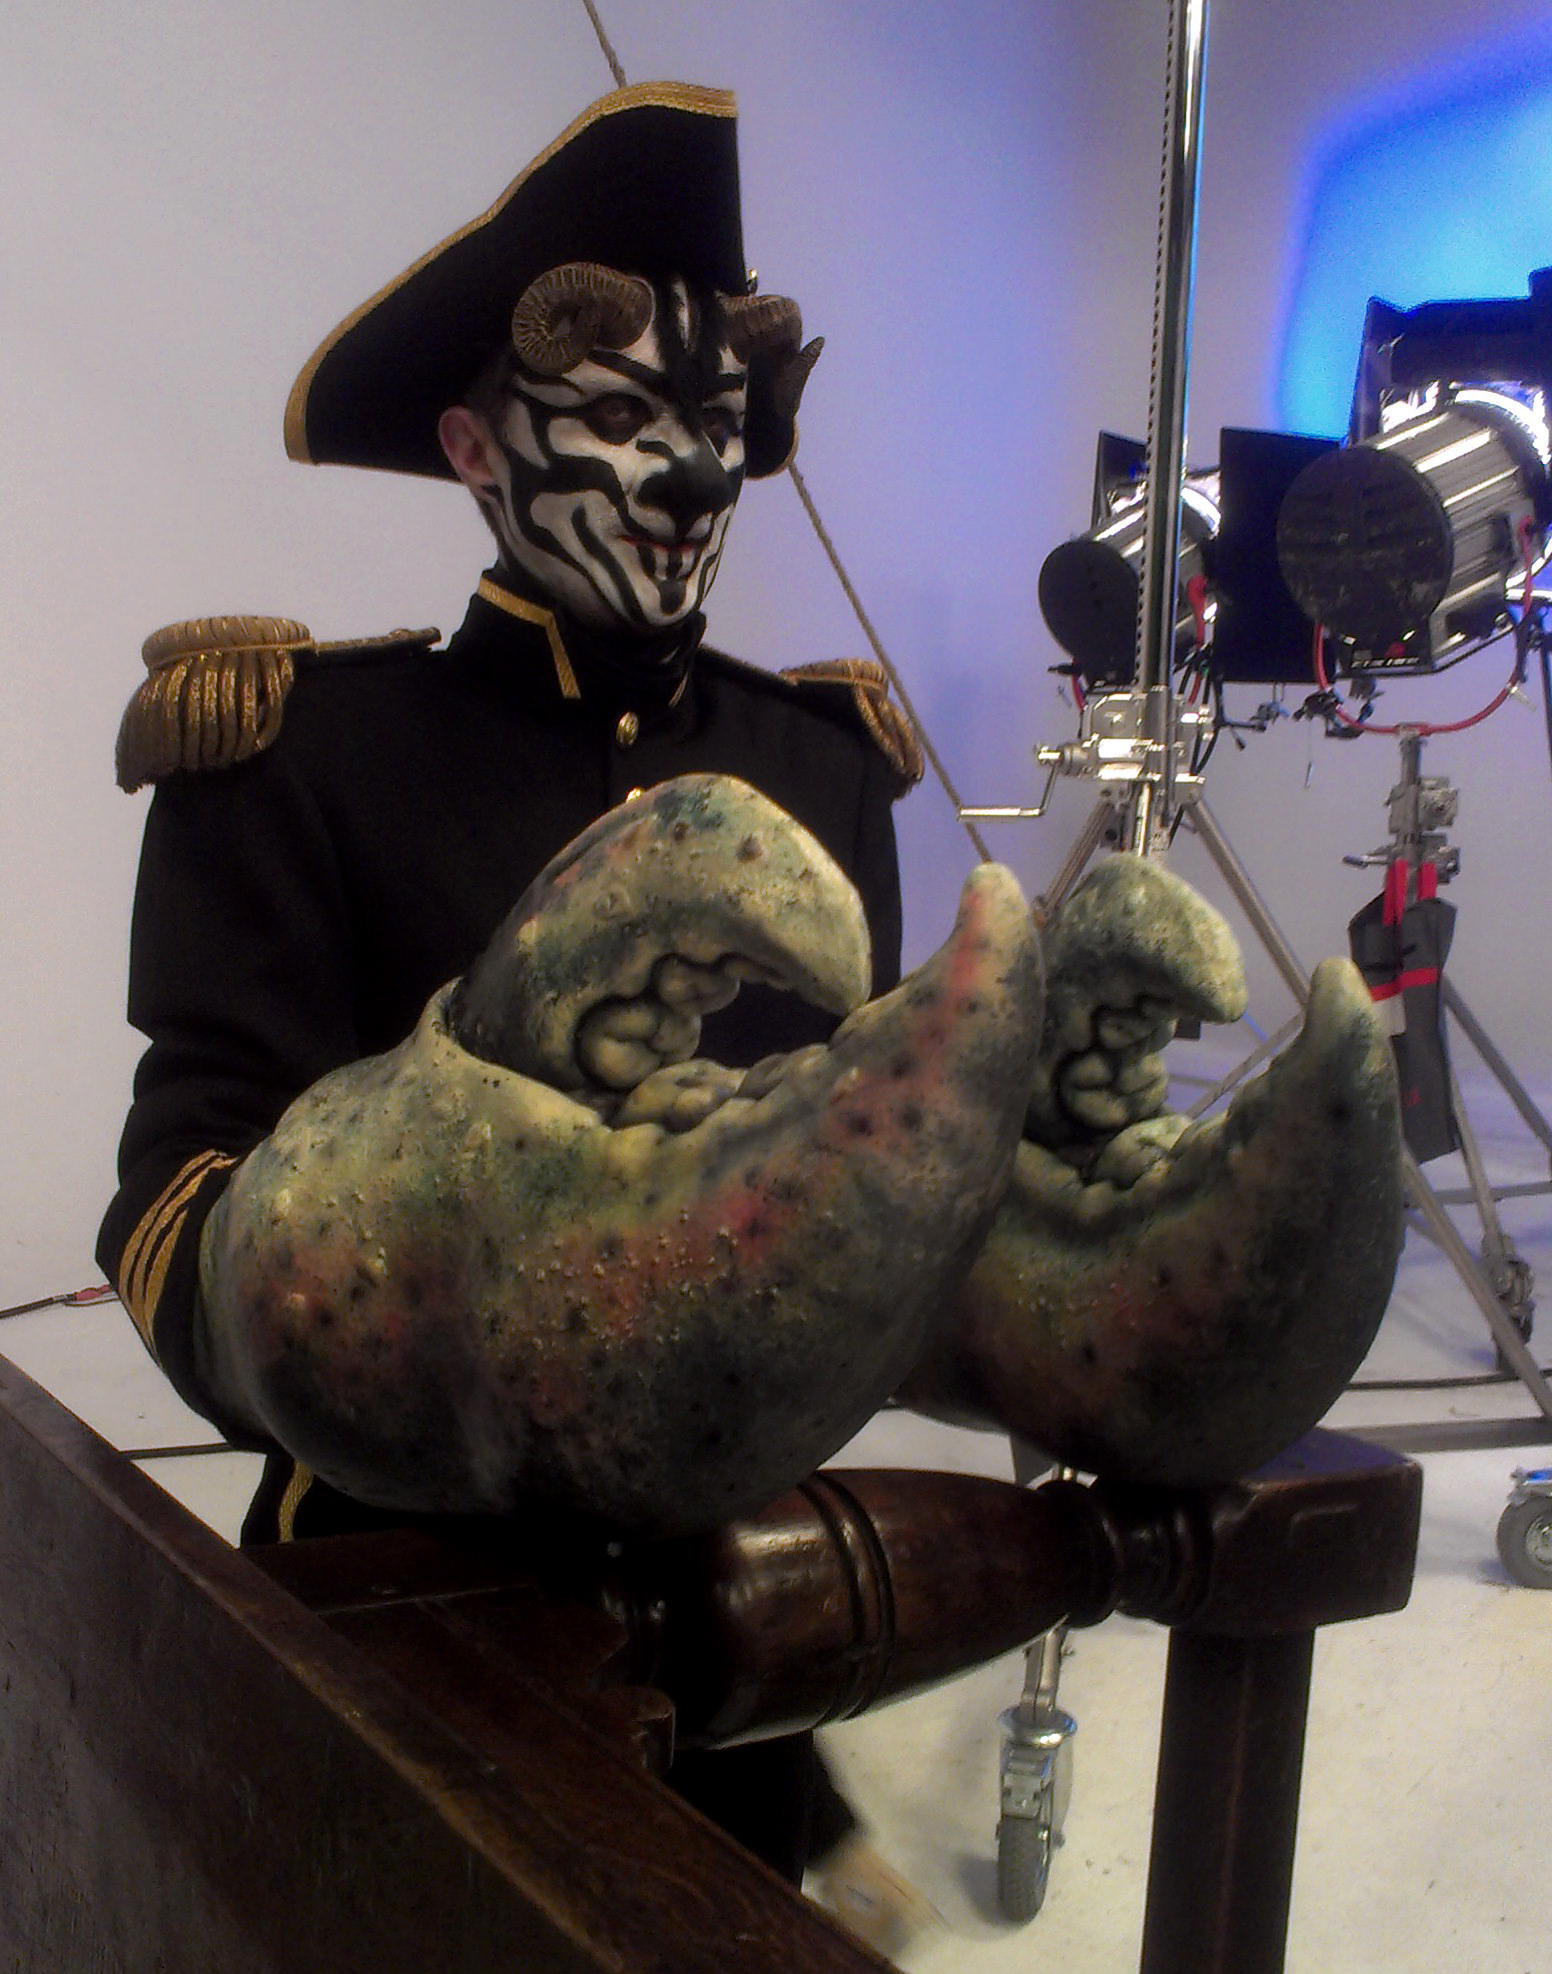
One such sketch involved Kevin Eldon as Charles Darwin talking to a fellow comrade who undergoes a series of evolutionary changes within the sketch.
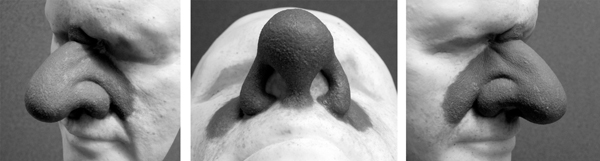
One thing that really helps a nose appliance is to finish the inside of the nostril area neatly, rounding it so it appears to go into the nose, and not appear too flat.
The first gag was a simple prosthetic nose – distinctly larger than the actors own but not so large as to appear impossible. The chap in question, comedian and performer Simon Munnery, had a pretty small nose to begin with which is always a treat from a prosthetic perspective. You can always add but you can’t subtract.
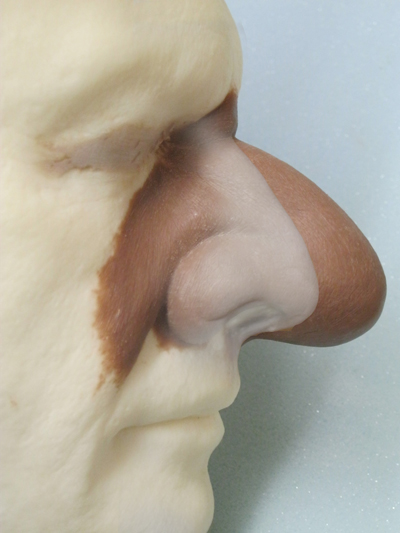
By superimposing the real nose beneath, it is clearer how much is added. It can help avoid ‘Mission Creep’ as production get excited about making something bigger without realising just how much is already added.
To make sure production was happy with the size, I emailed pics of the sculpt off, and realised that it would help to superimpose an image of Simon’s own nose over the sculpted one to make it more obvious what we had added.
Sometimes when clay covers the original features, it’s difficult to imagine what the original looked like, especially if you are showing a client unfamiliar with the original cast or performer. This way it was easier to show the final result and how much extra was added to get there.
For the gag in question, Simon had to undergo several stages of transformation, meaning return trips to the makeup chair in between shots. Once the nose was on and shot, the next stage was a pair of ram’s horns to sprout from the forehead.
Conventional horn makeup often consists of straight horns as these are easier shapes to mould and cast. Rams horns by comparison are curled and lay flatter to the head making them much trickier shapes to mould and cast out.
The first stage was to fit the copy of the life cast with armature wire in the right place, and to twist each horn to the right shape, making them symmetrical. Let me tell you, that took a while…you think you are ok then suddenly, move the face to a different angle and the whole thing looks wrong.
Once that was done I wrapped a thin coat of plaster bandage around the wire to give something for the sculpt to grip onto. Looking at reference images of real ram’s horns, we decided on the best shape and David sculpted both horns in about a day – pretty quick considering the awkward shapes and details involved.
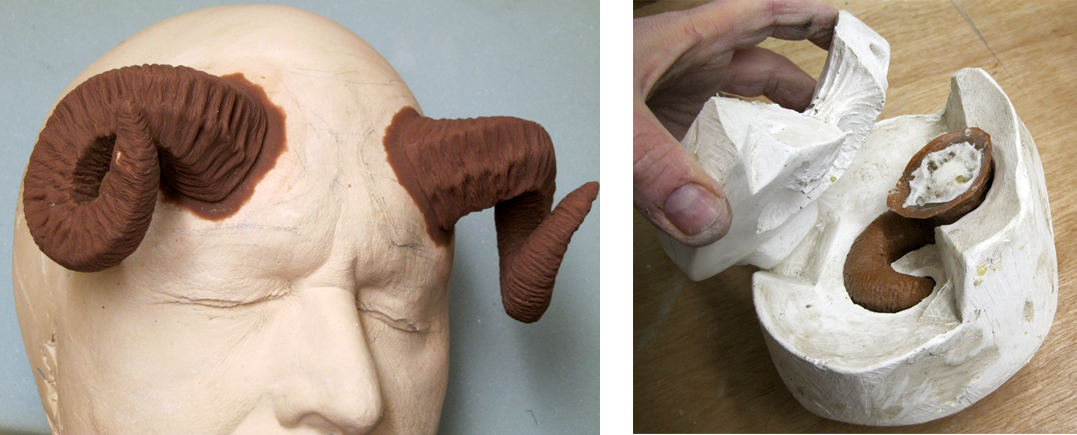
David Brown sculpted these ram horns, and I loved them! Look like tricky fellas to mould, don’t they?
Moulding the horns whilst on the forehead meant making the mould in two sections, a seam line following along the main curve of the horn as much as possible whilst allowing the second piece to pop out – avoiding undercuts is essential when moulding using a rigid material such as plaster. Hopefully you can see from the images how the mould worked.
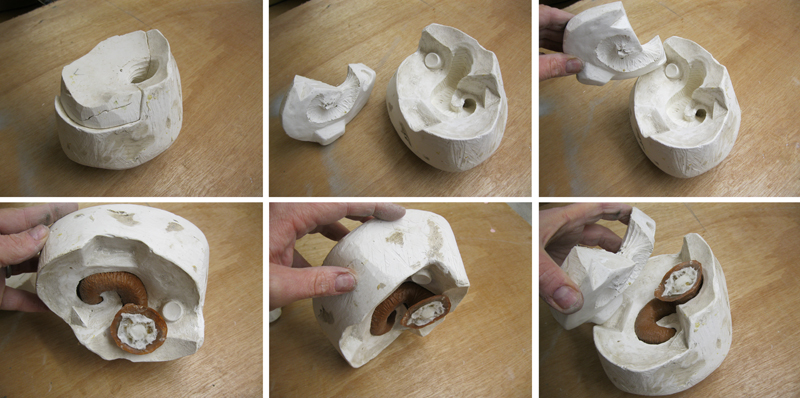
This sequence of photos will hopefully explain the way the mould worked.
The horns needed to be lightweight so I swilled the moulds with latex tinted with acrylic paint to a desired base colour, and then when this dried I filled them with two-part expanding urethane foam. This helped the horn keep its shape and remain lightweight.
The base of the horn was not going to be good enough to lose in the skin, and I wanted the horns to appear as if they had grown out from under the skin.
The addition of two small ‘O’ shaped appliances hid the base of the latex horn nicely.
We made two small flat moulded ‘O’ shaped pieces which could be slid over the latex horn which was glued securely in place first. This then provided the flawless blending edge we required, and the horns really did look like they had pierced the skin and grown through.
The horns were prepainted with acrylic paints, using mainly drybrushing to bring out the high points in a paler colour. Simple, but very effective.
Claw Blimey
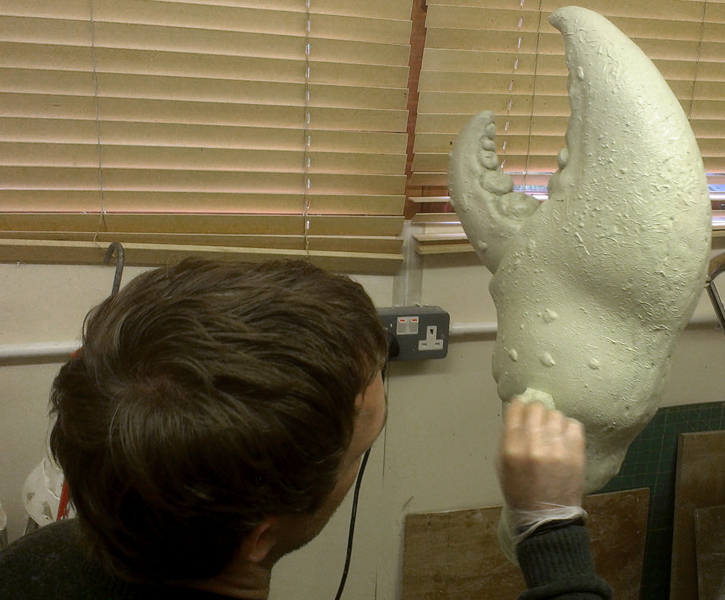
The giant crab claws were a lot of fun to make, and started out as a clay sculpt. Water based clay, just smooth buff-grey clay is great for quick sculpts of large shapes. It’s pretty cheap too! As they were pretty big, I had a large steel armature made to ensure that the weight of the clay sculpt and the plaster mould would be supported throughout.
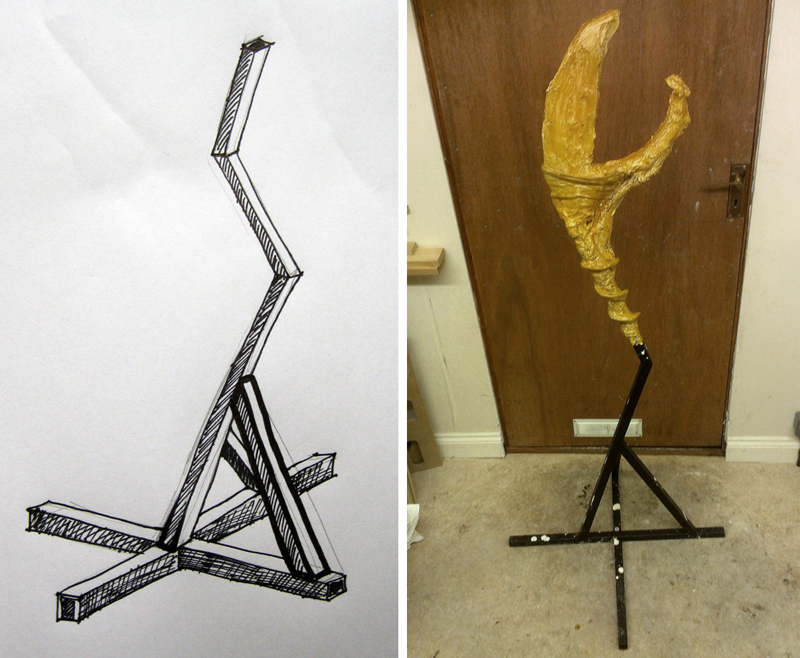
Steel armature! I had a welder make this up to my design, and it worked a treat.
The armature was bulked out with chicken wire and plaster bandage, and then covered with shellac, also known as ‘button polish. This distinctly yellow-orange lacquer is used to stop the moisture from the clay from soaking into the plaster and helps the sculpt to stay in place.
We bulked out the rough form quickly and sent off pics for approval to check we were heading the right way before committing to any detail. Once we get the go ahead, we add in the secondary forms and details, finishing with crusty barnacle-type crusts in places.
To do this, I collected up small bits of dried clay which had dropped beneath the sculpt during work, and sprayed the sculpt all over with water. Then, taking the dried pieces of clay by the handful, we aimed carefully and threw them at the sticky clay surface, securing them with another quick spray.
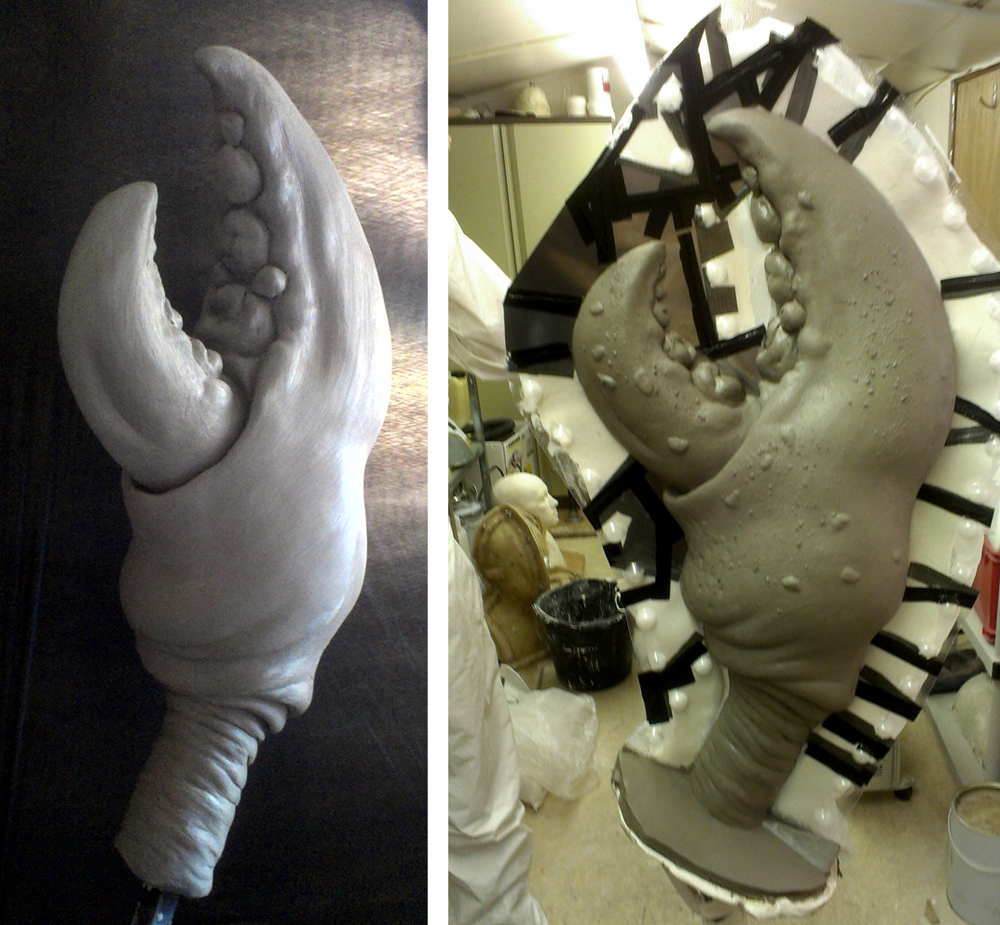
Crusty barnacles quickly made by lobbing dried out clay at the sculpt! Works a treat. Notice how I made the base of the mould flat so the wrist area was nice and flat in the mould. That way it’s just neater. I like neater.
This gives a natural looking placement of rough outcrops in random places, just like sea bound water critters with hard shells. We sculpted just the one claw, as the shape could be made symmetrical enough without compromising the shape to do for both left and right hands.
Once the clay was finished with, we allowed it to dry overnight to firm up, and then used plastic shim strips to create a wall for moulding in two halves. I don’t usually use shim for moulds, but as this was going to be a plaster/latex job with heavy textured paint finish I decided it would speed up the process without taking away from the finished result.
The shim is basically a thin vacuform sheet with inbuilt location keys made of hemispheres, so the two sides can be made at the same time and still locate correctly, saving time!
The plaster mould was made deliberately as thin as possible, using several layers of plaster and burlap scrim to give the mould strength. It was about 3/4″ (18mm) thick with strong edges to ensure the areas which would be clamped and levered against were sufficiently durable. The overall thinner walls of the mould itself meant that it was as light as it could be and would dry out quicker too.
The mould was left overnight to fully harden, and then the two halves were separated, cleaned out and left to dry over the weekend.
After the weekend of drying time, the mould was clamped together and plaster bandage was used all around the edge to ensure no latex would leak out from the seam. A 25 litre drum of latex (thickened by adding a latex thickener chemical to it) was procured for the job, and about 2/3 of this went into the claw to fill it to the top. I left the mould full of latex for about 6 hours, during which time a thickness of latex accumulates on the inside of the mould. Because plaster is hygroscopic, it wicks the water out from the latex leaving a skin behind.
As the plaster itself becomes more water logged, its ability to suck out moisture is reduced so there is a balance to be struck between thickness of plaster, thickness of final latex item and drying times.
We then emptied the latex back into the drum, and leave the mould upside down for a day to drain and dry off. This way, no thick pools of latex will remain in the tips of the claw, which would possibly not dry in time for the show.
After another day of drying with a fan left blowing into the hollow claw, the interior is powdered with talc and the mould opened, taking the hollow latex claw out. It is about 3mm thick all over and still damp even though it is dry enough to hold its shape.
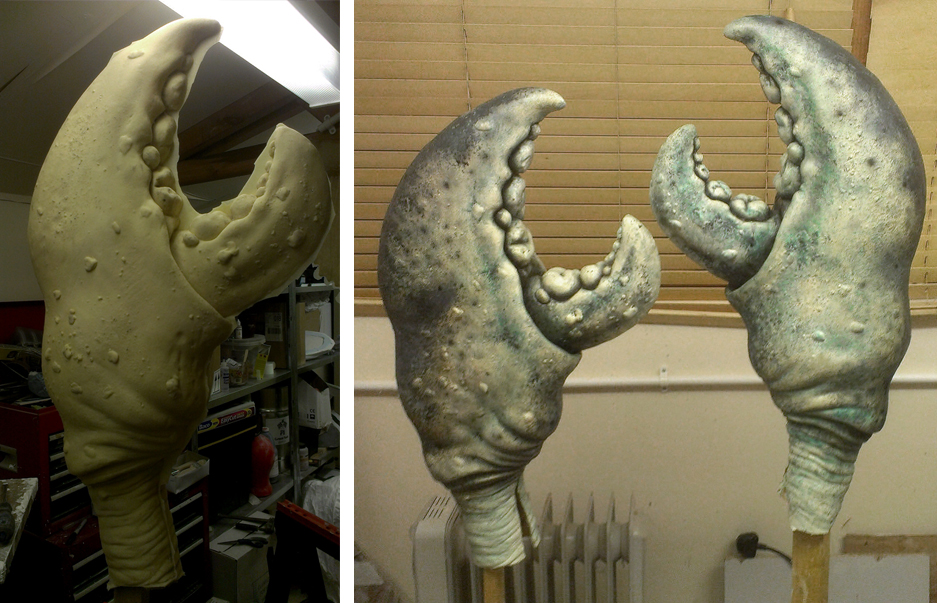
The raw latex, left, unpainted and unseamed straight from the mould. Seam was actually pretty sweet! Seaming was basically trimming carefully with curved scissors. The painting was done with PAX base, and washes stippled on with brushes and a sponge, some airbrushing with acrylic inks and a bit of drybrushing.
Even though three drying days have been involved, there is still a lot of moisture to come out of it, so it is left hanging up whilst the second claw is cast out just like the first. Overall, there was approximately a week involved in casting and drying out the two claws before we were able to seam and paint them. All this was accounted for in the scheduling, so despite this there was ample time to do it all.
Each latex claw was then replaced back into the mould and the inside swilled with a two-part expanding soft(ish) foam to stop the latex claws from looking like hollow bags when they were banged together and used in the performance.
David then went to work painting these claws with a pale sandy coloured PAX paint base, and we applied layers of mottled greeny-blues and browns, mirroring the rough pattern to create a distinctly left and right claw appearance even though the same claw sculpt was used for both sides.
A pale PAX base allowed us to ge much darker in places with washes and mottling and use the base itself as the highlight. The teeth-like nodules on the claws really popped by airbrushing dark greens and black around the base, so strting pale and going dark was the way to go.
The thumb slid into the smaller appendage of the claw to allow them to open and close, and once the paint job was approved, we bagged these up and moved onto the last few items.
Simon Munnery on set and between takes. The guy was an absolute trooper.
On the day of the shoot, the costume was adapted to take the increased size of the claw around the wrist, and it never ceases to amaze me just how quick and clever costume departments are when it comes to adapting things to solve problems.
Justin Selway, one of the designers was a trooper helping me with the claws fitting, and both he and Sam Perry came up with all kinds of neat tricks to slice, dice and stitch the costume to fit.
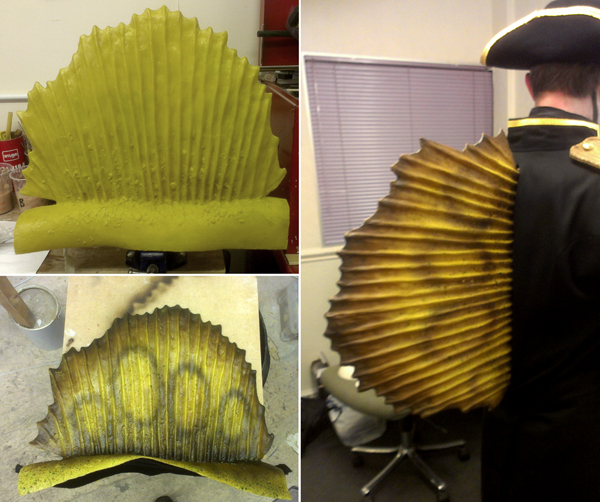
The crest was pretty straightforward to make – the real trick was in making the harness which supported it and then modifying the overcoat to allow it to appear out the back without damaging a beautifully made costume. I love it when you get to work with talented people from different departments. You get such great insights and realise just how much everybody knows about what they do, and that never really gets appreciated unless you see the problem solving in action.
David also made a rig for a crest, like the ridged plate shooting up from the spine of a lizard, which needed to come out from the back and go through the costume. Having something stay in the right place and be secure all day during performance ends up calling on all manner of skills outside of just the initial making aspect. I really got a kick out watching it come together and seeing departments collaborate to make something happen.
I will cover the last few gags in the next post, tongues and giant antlers. Who’d have thought? It’ll be out within a week. I am writing between sculpts and makeup tests so I am keeping my teeth sharp!
I am truly amaze of how realistic those claws, horns, and crests are. They look fantastic for me. With that quality, I can imagine how awesome it would look like if you create something like a zombie or a dragon, haha.
Really love the horns, brilliant!
To me watching this is very entertaining. Like it all, even though that B/W-Facepainting is a little weird to me.
Thanks Stefan.
Thanks for the kind words Stu I had an amazing time on that job, so much fun!
I can’t believe those horns are latex….
It’s such a nice sculpt that it would be daunting for me to mold that in plaster. The curve makes it difficult for me.
Where was the dividing line for the horn mold in stone?
Thanks for this post~
Those all look awsome! I would love to see how the mold was done for the horns!
Will this be posted online? Would love to see it?
Thanks for sharing! I’ll have to see if I can find “It’s Kevin” and watch it. I always like the BBC shows!