
 Scaly reptilian skin is a fertile area to draw inspiration from, and can be used in a lot of ways.
This blog post takes a look at the basic kinds and how you can create them.
I’m going to cover the main kinds, going step by step through each one, and then rough out a makeup design using them in combination to demonstrate how a design can be assembled from them.
Then I also take you through the paint scheme by actually painting directly onto the sculpt so we can see what the final result would look like without needing to make a mould, cast and apply it first. It’s a neat trick which means you can show off a finished makeup design and still be able to make alterations afterwards to the sculpt!
Check out the video below to see how it was done, and a few other neat tips which will help you make things look cool.
Its important to mention that reference is crucial, so do some digging and take a look at the variety of scales and skin textures, from Ostrich feet, snakes and crocodiles, lizards and all kinds of crazy things you may not have realise existed.
Nature has an incredibly varied palette, and it never ceases to amaze me. The ostrich feet skins shown in the video for example (which by the way were kindly sourced and photographed by Karl Derrick) look like something out of Jurassic Park. Who knew?
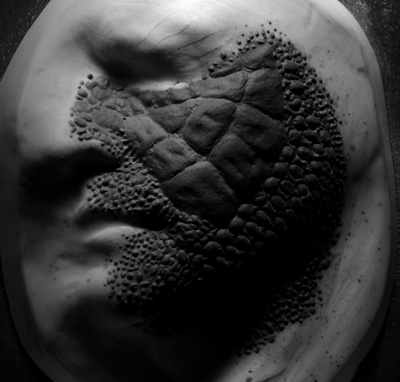
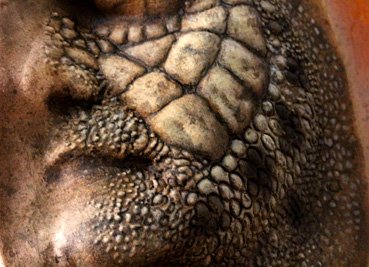
From a sculptural point of view, I have bunched scales and reptile skin textures into 4 classifications which is a hideous simplification, no doubt offensive to any naturalist experts who may see this, and to them I apologise.
1. Granular scales which are basically a rough, bumpy texture which can vary in scale.
2. Keeled which can be like a large scale granular scale, but specifically have a ridge or number of ridges on the surface for added strength.
3. Cycloid the overlapping scales most commonly thought of on fish.
4. Scute plates almost like horn or tortoise shell. Often found on the bellies of snakes and on well protected areas of areas like fronts of feet on crocodiles and ostriches.
So because there are different kinds of reptilian skins and scales, so Todd and I have done our own approaches to this theme to show you different ways of doing it. We have both created videos, and I have added mine here first as I am still editing the others (a lot of footage was shot, and I don’t want to rush them out).
As soon as that is done I will add them below and let everyone know when they come through. Todd has done a particularly fantastic tutorial on making a Pros Aide transfer, which these textures lend themselves to tremendously well, so stay tuned for that upload soon!
Please do leave a comment here if you enjoy this post, and also remember that we need your suggestions for future posts.
You can email Todd & myself direct through this email: stuartandtodd@gmail.com.
– Stuart & Todd
I Love the way you demonstrate the incredible techniques of sculpting and texturing…thank you greatly for doing these tutorials helps me tremendously with my sculptures. The most fascinating aspect was seeing how you created that membrane to be able to paint on the sculpture using “ultra 4 epoxy parafilm lpaintable mold release”…I’m still new at this but its exactly what I wanted to do on my sculpture…I found the ultra 4 epoxy parafilm lpaintable mold release product easily but there was another product I couldn’t find the “bald cap plastic thinned with acetone”…that you airbrushed on before the 4 epoxy went on…if you have some time to demystify that process further for me I truly appreciate it…no rush…I’m just extremely GRATEFUL and THANKFUL from the bottom of my heart for you having this channel and willing so generously to share your wisdom and knowledge with us.
hello, thanks for your awesome video. I am using Monster clay. Would I be able to use Isopropyl Myristate? to liquify the clay?
Can you give me the link to find out how to make the liquid clay to make bumps on an item? I am trying to give my octopus a little more of a textured look
Glad Stuartbray, I would like to make a better finish with my dinosaur sculpture but I feel that something is missing to make it more realistic and beautiful, and I would like you to advise me, I am using monsterclay, to put it liquid it is with alcohol how much should I use ?
I think naphtha would be most effective on Monster Clay, like Zippo lighter fuel.
Was the ivory base paint just straight acrylic paint? Or did it have a medium mixed in or pro-aide?
The cap plastic technique is such a great idea. I can’t believe you can just peel it off. Was the lifecast treated with a sealer or anything before the clay was on?
the part i am lost with is when your finished with sculpting everything, how do you apply this to a persons face? How do you get it from off the mould and onto a face??
You dont take the sculpt off. You make a mould of the sculpt whilst it is on the core, and then when everything is set hard, you pop the mould off the core so you have a complete version of the sculpt but in reverse, negative.
Then when all he plastiline is peeled out and the moulds cleaned and reassembled, you will have a void where the plastiline once was. It is into this void you introduce the material the appliance will be made from, either silicone or gelatine. It will replicate the sculpt exactly, and the inside of the piece, the back which sits on the skin will conform to the face shape as it was sculpted on this form in the first place.
-Stuart
I think I am going to redo my project now. Thanks Stuart! awsome tutorial!
What is the difference between clay and the stuff that you’re using?
Standard clay is water based (like the stuff potters use) whereas the grey stuff in the video is plastiline, which is oil based.
Its basically a high grade plasticine which kids use. It doesn’t dry, so remains consistent however long it is exposed to air and can be softened or even melted with addition of heat. so it can be poured into moulds like wax, and left to cool. It’s great!
That was cool!
Exact the thing I needed to know, because I’d like to do a red eye leaf frog statue some day and wondered how to make all these little blobs the skin has. Great trick to use a syringe for the slurry!
Also thank you for sharing the painting-technique on the sculpt, that’s really great.
Steve