 This post takes a look at creating wrinkles and breaks down a straightforward method which takes the mystery out of how to make them much more realistic every time.
You may want to create a subtle ageing effect or maybe recreate the Caglione & Drexler Pruneface makeup from Dick Tracy…either way, the principle is laid bare below.
And, yes. That is me I’m afraid. My pirate alter-ego – cap’n Nohair – Aaaaarghhh!
What skin does
Skin stretches but it does not compress – instead it bunches up and creates folds. When you scrunch up your face and cause the facial muscles to contract, the area of skin that makes up your face is suddenly squished into a smaller space- inevitably creating folds of skin and wrinkles.
When creating prosthetics, it is often useful to take reference photos of the subjects face in a neutral, relaxed pose and also pulling a scrunched up smile, so those places where the skin bunches up become much more obvious and can be included in the sculpt to allow for better, more realistic movement.
When joints move, skin on one side of the joint is stretched, the other is forced to compress, invariably creating folds and wrinkles of varying degrees. The elasticity of the skin will dictate how smoothly it appears when it is again relaxed. As the person ages, so their skin remains increasingly wrinkled as the ability of the skin to ‘ping’ back is diminished. I find as the ageing process works it’s magic on me, I become my own reference material.
(Yay – I win).
This is an important thing to be aware of in larger appliances or body suits. Usually the original lifecast of a body is made in a position with all the major joints semi-flexed so that the suit made on it does not need to stretch so much at the joints.
Imagine in the legs where cast straight, and when the final suit is worn and the knees are fully bent. The amount of stretch require on the front is huge, as would be the compression on the back.
How to create it
- A wrinkle is a meeting place of two areas of skin, and the wrinkle is the result.
- Sculpt the skin either side of the actual crease in order to arrive at a wrinkle.
- Once these mounds of skin are blocked out, the line naturally occurs and can be hardened up using a thin tool or pin through plastic.
- If you have a very flat area and try to create a wrinkle by just putting a line in the surface, you will most likely not create a wrinkle so much just as a line in an otherwise flat plane.
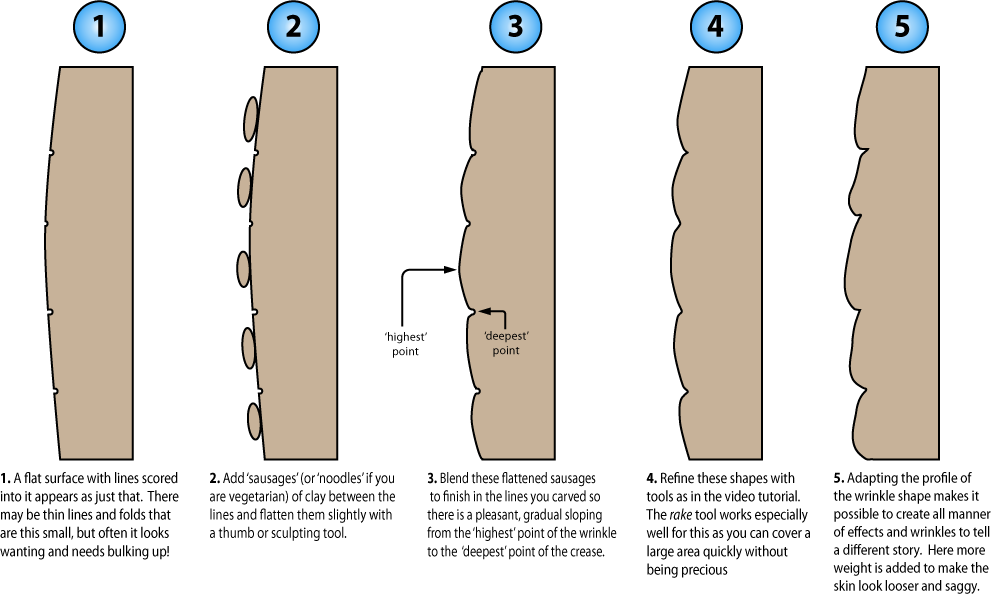
- Check out the illustration below – if it is too small to read, just click on the image and it will open full size in a new tab for you.
Too see this in action, check my sculpting video part 1 (http://www.youtube.com/watch?v=66V7egZo308 – zip forward to 08:06 to see this method in action). The wrinkle is by definition there because of the volumes of soft flesh either side of it trying to squish together, and it is these which need to be sculpted to get a wrinkle.
If you want the skin to appear thinner, it also helps to add a little more weight at the bottom of your built up mass to suggest gravity is working it’s little magic too! Varying the profile of this wrinkle mass will give you a huge variety of effect.
==========================================
If you get stuck with any sculpting issues – just email me a pic and I’ll do my very best to help you out. Please leave a comment or suggestion below – I would love to hear what you think.
==========================================

My bundles of joy!
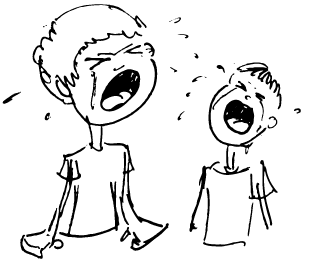
I will be posting that Waking the Dead sculpt next – just in the editing phase now. It’s been so busy, plus my kids are incredibly demanding – at the moment we are on half term so they are home and experimenting with ‘Daddy sleep-deprivation’ apparently.
They spend most of the day as the illustration would suggest.
Happy sculpting!
-Stuart
All material, images and text © Stuart Bray 2011


Pingback: Misconceptions and Facts: Lies and Truth About the Business of Modeling
The excellent informative post you shared on this page with the outstanding steps to eliminate the wrinkles from the Sensitive skin of body in a seven days and increase the beauty of skin by using the hemp seed oil daily according to the period of a time after the recommendations of a doctor ,You must remember the instructions of a doctor which help you to eliminate this kind of wrinkles disease rapidly ,My suggestion is go to a doctor one time in a week for starting of proper treatment of eliminating wrinkles appeared on the Sensitive skin of body for increasing the beauty of skin in a summer season due to the effect of sun rays,keep it in your mind don’t work in the light of sun because the heat of sun with the dust particles of sun rays increase the rough dryness with wrinkles and cracks with lines on the skin due to the demaged of upper skin layers cells after the working of some time you notice the color of skin become black and cracks with lines are increased on the Sensitive skin of a body this is also a effect of skin cancer . So take care of skin and avoid to work in a light of sun . you also use a mask on the face if necessary to work in the light of sun and also use carrot in the food salad because this is effective for the removal of skin wrinkles .
Thanks.
thank u for sharing all this info its so helpful,,,can u pls give us a look at 3d transfer am nwe to special effect and am self taught so every little detail is count,,,thanks a million 🙂
Have you checked out Todds book? Click here
Also, check out this tutorial: Todds Bondo 3D transfers tutorial
Hi Stuart,
Once again, great tutorial and well presented, look forward to more of your work.
I can relate to the kids on half term 🙂
Regards
Craig
Hi Craig…thanks for the support!
Yeah, love them to bits but my word, it certainly gets in the way of business. And this past school term has been shot through with bank holidays, royal weddings and school teacher training days with schools closed. Enough already!
-Stuart
I too love your efforts of education and like others, to attend a workshop or two.
Have you made it to Texas, USA or possibly planning to. We talked about this last year 2010 still in Northern California. Is it to early to think about Halloween and haunted house makeup. I help at a haunted house, starting in late August Realms of Darkness/ http://www.realmsofdarkness.org/. We keep trying to improve each year and I tried making my own prosthetics with liquid latex, mostly scares and evolution.
Any ideas would be of great help.
Thanks
John
Hi John
I will be coming to Texas in August and plan to do a couple of workshops with BITY – so maybe if you can make it then I’ll see you there.
It is never too early to think about Halloween – and I am so jealous that Halloween is a much bigger deal in the US than here. The haunt industry here is tiny, but everyone loves a good rotting zombie coming at them all drool and maggots. My Awesome Latex Ecourse is packed with detailed appliance making techniques. Also my old blog about a stage version of Frankenstein is a good overview of making cheap appliances that look great for haunts and theatre shows.
Thanks so much for checking my stuff out and commenting! I appreciate it.
-Stuart
Thanks Stuart Have lots of fun doing this. Am working on Josef and his Tecknikolour Dream coat at the moment aging and all that.
Hey david
Thanks for commenting!
I know it has been a while, but when I was at school I am sure that Joseph’s coat was just ‘amazing coloured‘, but now seems to be sponsored by a major motion picture colour process which phased out in the 50’s.
-Stuart
Hi Stu
You Rock! man your always’s putting together awesome tutorials, posts & workshops for us guy’s n gal’s.
Having already done 2 of your workshops that were amazing im looking forward to attending more in the future.
Your attention to detail and genuine enthusiasm to want to help others achieve their potential in understanding and perfecting their prosthetic skills, regardless wether your at a intermediate level or advanced level is second to non.
Your always their to dispense sound advice and to give us tips that you have accumulated over the years in your chosen profession.
Im sure i speak for us all that despite having your hands full with your demanding kids (Lol @ the sketch) to still find time to share more fascinating tips with us all say’s it all total dedication and commitment.
Also you always’ find a way of slipping in a bit of humor to certain places which is always a laugh and keeps things from being too formal and boring.
So once again thanks Stu keep up the good work and im sure i’ll catch up with you soon at one of your workshops …Take Care …Ra
p.s keep us updated on some of the stuff your currently working on as it would be interesting to know what movies etc your working on so we can look out for them.
Cheers fella
I wish I could post every day but there just is not the time and I like to make sure enough effort goes into each one as much as I possibly can.
The last thing I did was a movie called 47 Ronin. Can’t tell you anything about it or show you anything as I am contracted up to the nines to keep shtum, but when it comes out you’ll see!
-Stuart
Very interesting.
Great, thanks for this post! Especially for the illustration!
Hi Stuart,
I love receiving these tutorials from you and practicing your techniques.
It is so generous of you to share you knowledge.
I hope one day to do your course and learn even more from you.
Your work is amazing.
Jules
Hi Jules
Thank you for checking the blog! You know, you hit send and hope for the best, but until people get back to you and give you a thumbs up or down, you don’t actually know if it the right or wrong approach.
-Stuart