
Back in 2013, I did a presentation I called ‘Alternative sculpting techniques‘, and it was a manifestation of frankly the weird way I often see things.
A cry for help, some might say.
In it, I had cracked plaster, allowed moisture to creep into coffee granules and letting a bitten apple go mouldy, all to create shapes and textures which could be harvested for use wholesale or modified as sculpts to be incorporated into appliances. Check out a video of that presentation here.
Easy wrinkling technique video:
For an episode of Waking The Dead, we had to create water immersion wrinkling on hands and feet on a corpse who had been found in a reservoir. This basically meant four appliances, one for each hand and one for each foot, each with man wrinkles all over the surface.
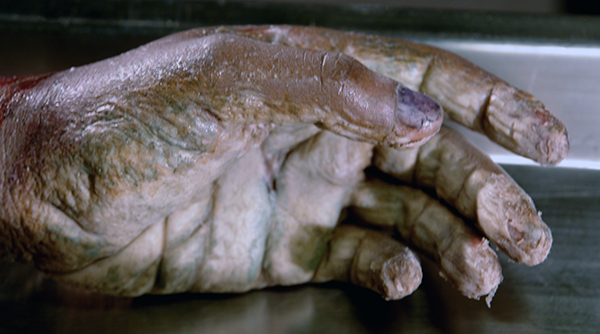
The hands here applied, distressed and Waldo created additional sloughing skin with thin layers of cap plastic.
Makeup head Viv Riley and prosthetics designer Waldo Mason designed the effects, and had an excellent reputation for the good work they did on this BBC forensic crime drama.
Hands and feet and areas which often get less attention and are underestimated in the planning phase or quoting, as they usually are not the focus, and so the true horror of the extensive amount of edges that ten fingers and toes can create may not visit upon you until you start sculpting and realise how much work can be involved.

A simple outline with a tape measure ensures print-outs can be scaled correctly.
This being the case, and there being little time to create the effect, we worked on a quick method which would speed up the whole process. Firstly, we didn’t have a lifecast of the hands and feet so I had the makeup artist trace around the outline of a hand and a foot onto a piece of paper. I then had them take a photo of that
Then I set about mixing up some old silicone that I had with some thixotropic to make it into a paste, catalysed slow to avoid rushing and carefully depositing it into the sections divided by the natural creases at joints and in the palm etc.
I placed a sheet of cling-film over the top and using a coarse sponge, brushes and some smooth sculpting tools, set about shaping and texturing the masses to cause wrinkling to happen. The membrane of plastic meant that the silicone didn’t stick to anything, so the working is clean.
Indentations and dragging caused wrinkles to naturally occur, and dragging the surface causes tension, enabling very realistic effects to happen quickly. You get a feel for how firm or gentle to be, and you can endlessly rework it until you arrive at the shapes you want.
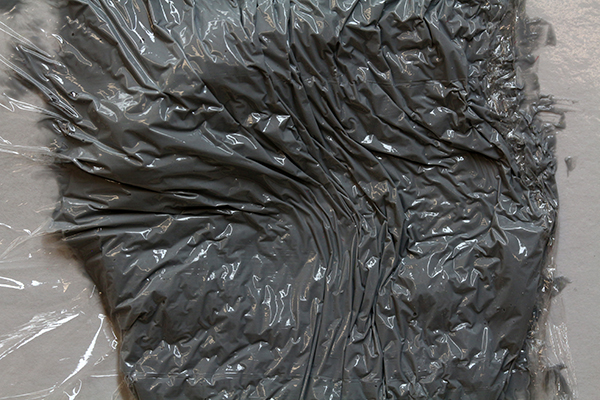
Cling Film skin creates very coarse linear wrinkles
Alternatively, you can use cap plastic. By painting or airbrushing some layers of thinned cap plastic onto a sheet of silicone (I used the back of a large flat mould), you can create a thin, flexible skin which behaves in a different way as the thinner membrane stretches more readily, creating more subtle effects.
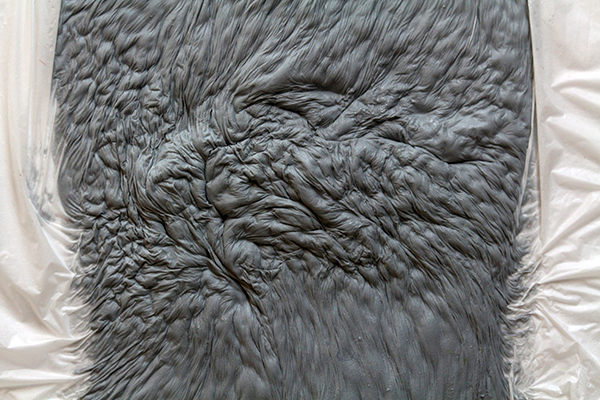
Cap Plastic acts as a much more flexible membrane creating softer effects.
Cap Plastic membrane can be made as thin as you dare to go!
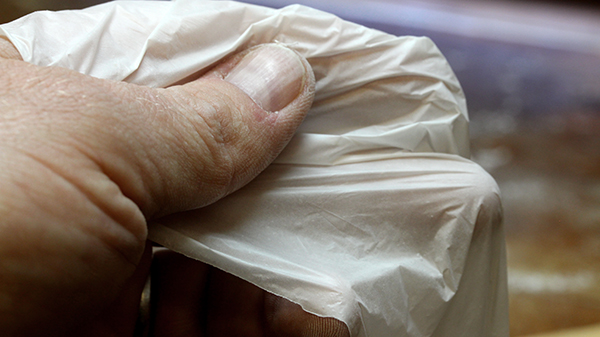
Once happy, you can leave the plastic in place and set the boards aside to let the silicone cure, and then you can either make a quick mould on this in silicone to make pieces (a bit rough but it will work) or, as we did, make a quick mould and then put molten plastiline into that to essentially make the rough sculpt.
Molten plastiline poured in and scraped, left to cool and chill will be easy enough to peel out and place back onto a board to be reworked, tweaked and finalised if any clean-up is required.
This can then have a cutting edge and border strip added before moulding, and there you will have a relatively easy and quickly made set of pieces that don’t look too deliberate or crafted. The trick with most FX work is to create something (usually over extensive time periods) that looks natural, like ‘it happened’ rather than it has ‘been created’.

Introducing elements of controlled randomness, such as manipulating a membrane on a soft paste allows you to cause wrinkles to happen rather than directly have to sculpt each and every one. You then have the option to capture those shapes and make moulds, and it is a technique I like to use.
Leave me a comment if you can use this, or if you have any projects where this technique may be useful!
Stuart
Thank you Stuart again for great tips. And thank You Hobsend for telling Smith`s way`.
I have also used gelatin as a membrane earlier. Have to try Stuarts way now:)
It should be noted that this is not the only ways this can be done. Dick Smith did his own version, using extra-soft water-based clay and sheets of gelatin, for the movie, “Ghost Story”. He also used foam latex and plastic drop cloths, in a similiar fashion to directly sculpt all the wrinkles on the mummy/corpse suits, for “The Hunger”.
Personally, I like to use a membane over wax-based clay. When the wax-based clay is heated, it can also be manipulated, as suggested above. But, it has the advantage, that when cooled, the membrane can be removed, then the clay can continue to be sculpted, directly. This can help greatly, when used on larger sculptures, and when timelines are at their shortest.
Although, with Brays’ version, you do end up with an intermediate mould, that can be reused at a later time. So, his ideas have their advantages, too.
The point is, you can use nearly any flexible membrane over a soft, maleable, sculptable surface, to easily sculpt spontainious, freehand wrinkles. But, don’t rely on only one version of the technique(s). Feel free to mix&match which ever way works best for you. Who knows, you might discover a variation nobody else has thought of…
Awsome, thanks for all the tips !!
Excellent
Cheers!