Creating good edges is kind of like personal hygiene…
if you do it properly it goes unnoticed.
 It’s only when you stop washing that it attracts any attention!
Thus, by definition ‘ good’ edges are not noticed – if you do a good job of blending them, then they are not there to be seen.
This post is inspired by a great email I had from someone who emailed asking how one gets great edges on a prosthetic.
I love this kind of question because it is simple, direct but makes me really think about the answer. After much deliberation, my answer to you, Howard, and anyone else who is interested in great edges on prosthetics is in this post!
===============
The point at which a prosthetic appliance stops on the skin creates an unavoidable edge (if it does not then it is not a prosthetic any more, but a mask!) and the ideal situation is to blend that edge to nothing so you can’t see it. That is where 99% of all prosthetic issues occur once the thing is applied.
Getting a flawless blend between the ‘fake’ of the appliance and the ‘real’ of the skin is where most of the work is in prosthetic makeup. This can be hampered by an unintentional thicker edge and a noticeable colour difference between the skin and the appliance after application.
Whether visible edges are important or not depends on what the makeup is for. If the makeup is for a theatre production for example where close scrutiny is not so likely, then less than perfect edges are not so much of an issue. However, most situations require for the best blend possible and that is what we are concentrating on here.
For great edges that need to get close to a camera lens, here are the things that need to happen to get great blending edges on appliances…
-
Start with a good lifecast
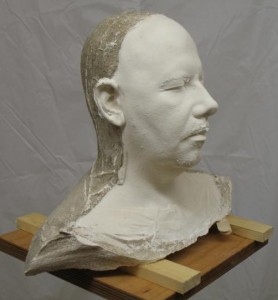
Fresh plaster lifecast straight out of the alginate. Despite the mess and slight imperfections, this cast had no distortions!
If making a custom appliance, you need to get off on the right foot, so to speak.
It needs to be an accurate copy of the original, without distortion, major air bubbles or serious imperfections.
Small air bubbles etc can be filled and the seam line can be shaved down. However, large discrepancies are harder to fix and may require a re cast!
-
Make sure your sculpted edge is tapered well.
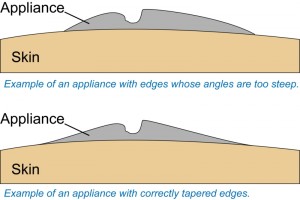
This illustration shows how a rapid or steep angle will be obvious on skin, where as the gentle taper naturally blends into the skin.
Ensure the form of the sculpt shifts naturally to the surrounding anatomy
of the skin surrounding it. Match the texture of the surrounding skin right up to the edge.
The illustration to the left demonstrates how the angle of the appliance approaching the skin must be sculpted to taper naturally.
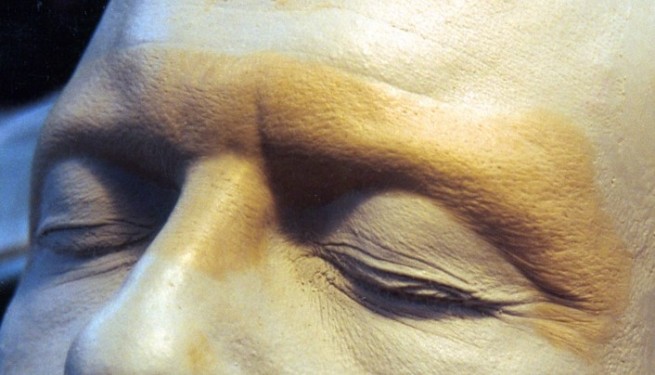
Forehead sculpt for a TV show. This appliance was very thin, and the edges blended nicely into the existing forehead.
-
Decide where to put your edges carefully.
Consider carefully where exactly the edge finishes. For example, if a cheek appliance is made a little larger so that the bottom edge finishes beneath a jawline where it is less noticeable. In fact sometimes you may need to…
-
Make a larger appliance.
Larger scale prosthetic makeups were often broken down into smaller, overlapping appliances. This was a technique developed by Dick Smith to counter the shrinkage that occurred with Foam Latex, the main appliance material of the time.
Nowadays, almost all large scale prosthetics are achieved using silicone which does not shrink – quite the reverse, actually – and consequently larger, single appliances that cover more of the face or even a whole head or body part have come back into use.
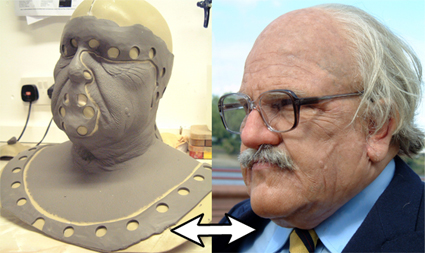
This silicone makeup used a large wraparound face appliance with seperate forehead, nose and ear appliances. The appliance around the face could have been made from smaller overlapping pieces, but I wanted to reduce the amound of blending edges.
This technique requires more skill to handle such a large appliance but can cut down application time considerably.
Edges can finish under costume or the back of the neck and there are fewer of them.
Not all situations warrant a huge appliance, so this needs to be weighed up and a balance struck.
-
Make a great mould.
A good mould is essential, so that you get an accurate copy of the sculpture in reverse. In the case of a two-part mould with a core and a mould, the two must fit together perfectly, with no warping or distortion of the two parts to fit together. Making sure any location keys work properly and avoiding undercuts is important too.
-
Cast good appliances from your good moulds.
Casting well from your moulds is also important. No good having a great, accurate and durable mould and then not actually getting a usable appliance out of it. Carefully getting the appliance out of the mould (de-moulding) is also an important skill to avoid damaging the edges.
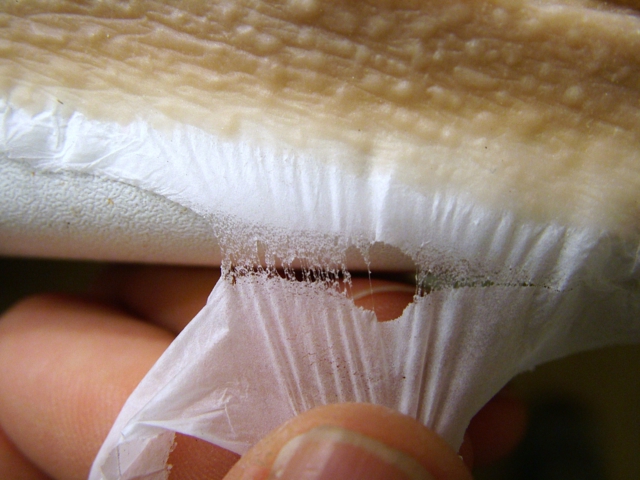
This image shows just how thin a thin edge can be. An appliance with an edge like this is a joy to apply once you know how. Notice how it is all but separated from the excess (or 'flashing') by a cobweb-thin membrane.
Often, an edge known as flashing will still be attached by a thin membrane (see image above – also note how the skin texture and bumps etc go right up to the edge as mentioned above). Preserving this edge until the last possible moment before application will enable you to handle the piece for painting or even application. This will reduce damage to the ‘live’ edge (the actual edge that will finally be applied to the skin and blended) before the piece is needed.
-
Stick it on right.
Good application is essential as you can obviously make a bad job of applying a great prosthetic. If the super fine edges necessary for a natural blend should roll under themselves or get stuck badly then it will need to be fixed so the edges are not obvious.
Fine edges by their nature are beautifully thin but also difficult to handle and are easily damaged. I once had a makeup artist complain that the edges were too thin and she could not actually apply them. She was complaining that the edges were too thin which is precisely what you need to get a great blend.
This incidentally is why appliances are rarely reused, as the edges on an otherwise useable appliance become easily damaged during removal. A new set is usually required for each day.
-
Colour it well.
Once the appliance is glued down flawlessly, then the colouring is the next stage. There are a few things that need to be considered when making up appliances that do not happen during conventional makeup.
The way colour grips skin and an appliance may differ, so ‘wiping’ colour on with a sponge is not likely to work. Instead stippling, flicking, airbrushing or dabbing of colour is much better for prosthetics.
Below, you can see two makeups halfway through colouring. The foam latex makeup on the left is much more work as foam is naturally opaque, and much of the work goes into getting a translucent effect. The image on the right is painted only on one side so you can clearly see how the absence of a red stipple on the wolf nose is missing.
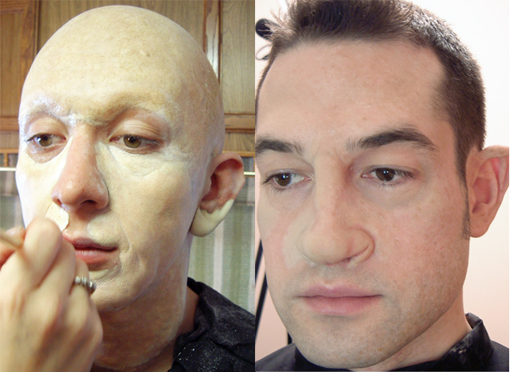
These two images show how edges are still clearly visible once applied but before colouring is complete. Image on the left was for David White (Altered States FX) and was for a commercial. The pic on the right was for a reality TV show done for Neill Gorton (Millennium FX).
Also, conventional cosmetics do not work well on appliances as they appear differently on skin that prosthetics, sometimes soaking into the appliance material and not the skin.
This is another way in which edges can be unintentionally revealed so using the right kind of makeup (PAX paints, Rubber Mask Grease Paint or Alcohol Based colours for Silicone etc) will help prevent this issue.
-
Maintain those good edges.
Edges do not remain unchanged throughout a shooting day. Mrs Doubtfire lied to you!
If an actor is sweating all day in action scenes, then edges will start to degrade and need maintenance pretty swiftly. I spend most time on set watching the makeup gradually deteriorate and respond to this by eating cakes, drinking coffee and fixing them with glue on a cotton bud. After meals there is usually a big mess to attend to – especially if someone had a pile of fried chicken for lunch and the mouth appliance is hanging off like a dogs ear in the wind.
Re-gluing, patching holes and fixing any colour which has been damaged is what you will do all day, and hopefully, the result is a makeup which looks the same on camera in every take.
Hi Def is a new issue for prosthetics for TV shows given that traditional TV images and screens were not so large and detailed. For movies the bar was always high as close ups on a cinema screen leave little to hide behind. Consequently, the level of attention to detail and quality given to movie projects now needs to be given to TV also. This means working to a higher standard and maintaining best practice at all times. You were going to do that anyway though, right?
-
Practice screwing it up, then try fixing it.
Doing this well requires the experience gained from practice, and practice remains the most crucial element to being capable in any field of expertise. I seriously recommend slapping something on badly so you can then practice dealing with folded edges etc.
Regardless of what you learn, whatever course or workshop you attend or any book you read or Video you watch…none of the information will be retained or made relevant to you unless you perform the actions repeatedly. Just because you know something does not mean that you can actually do it.
Document everything to ensure this is recorded so you and others – me even – can review your work honestly. Always take photos or video if possible. The images remain the same regardless of your fleeting emotions about how you feel towards them.
-
Use the flashing.
Flashing around the edge can be used to preserve the ‘live’ edge you want too use later. This can be used to handle the appliance prior to use, and be pinned etc when pre painting etc.
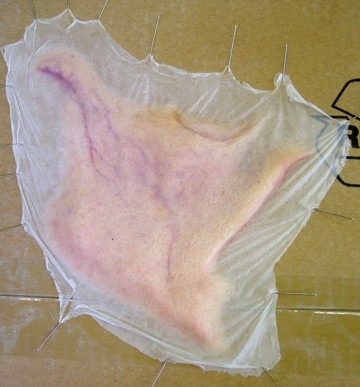
This image shows a silicone appliance being prepainted. Notice that the flashing extends way beyond the edge and can be used to pin the appliance to a board making it much easier to work with.
Never cut the flashing off with scissors as this creates straight lines which are rarely seen in nature or the human face.
Instead, tear the edges along the thinnest point where it should naturally create a feathered and slightly irregularly shaped edge which is easier to blend into the skin.
-
Make it soft enough.
Material softness matters, because if the appliance is stiffer than the skin it is applied to, then when the skin moves, the appliance becomes apparent as it cannot move the same way. It is relatively easy to adjust the softness of silicone in a consistent manner but foam latex requires more experience with mixing ‘rise’ time.
Confused? Foam is strange animal that confuses even the experienced – it can even sense your fear!
-
Last resort – fill it!
You can fill edges with a filler sometimes known as bondo or cab-o-patch. It is made by mixing togther Pros Aide with Cab-o-Sil (Fumed Silica* – an inert filler used in many resins and other casting materials to bulk it out and thicken).
This material is then carefully applied to the areas which need to be filled, and dries clear and plexible, working with the makeup (usually foam latex or gelatine).
For silicone appliance makeups, you can also use a silicone paste such as Sculptgel or a thickened mixture of the silicone used to make the original appliances for the best colour match.
This is a last resort as it also can create a border of smooth, texture free skin which is just as noticeable as a step or thicker edge – in an ideal world you shouldn’t need it, but hey…whatever works!
*You should be able to get hold of this wherever you buy casting resins and materials. Always read and understand the health & safety material and ensure you have adequate protection when using materials.
Creating prosthetics involves a series of procedures – each one building on the last – and each one provides fresh opportunity to damage what has been does so far. Treat each stage with the presence of mind it deserves, and you have done all you can to get the best edge.
================================================
Well, there you go. That is what happens when I get emailed a great question that sets my mind thinking. Thanks Howard – that was about a week of spare time but it’s my own fault…I can’t resist!
I had a blast putting this together. If you have any technical questions that I might be able to shed 2275 words on, please pop a comment below and email me at mail@learnprostheticmakeup.

Seriously, I’d love to know if this was any use to you and what you think.
-Stuart
All material, images and text © Stuart Bray 2011

Hello Stuart! Forgive me, I am a complete neophyte. I have written a starship adventure screenplay and am in the process of filming it. Good thing I didn’t know what I was getting into when I started! I am creating my own alien characters and have had to give myself a crash course on latex prosthetics. I have experienced the above-mentioned edge issues.
I have been using scar wax to hide the edges. It works until the actor begins to sweat and then I find myself stopping the shoot constantly to “fix” the edges. After reading your tutorial I now know (after almost finishing the whole movie) that my edges are far too thick and I am using the wrong blending material. Thanks for helping me know what to do when I start the episodes. Yes, I’m going back for more silliness…
Stuart,
As always, an incredible wealth of info and knowledge. Always a pleasure when a Master is so willing to share their experiences with everyone else. This was awesome. It made me re-think some of my ideas and technique.
Great write up mate
Lovely write up mate,
Hey Stuart,
FLESH TONES
I’d like to paint/color some prosthetic pieces (flesh tone) for my face (prosthetic forehead, nose and cheeks). The pieces don’t cover every inch of skin on my face, some of my skin will be exposed.
Apart from using alcohol activated makeup such as skin illustrator OR using washes of color (pigment+ platsil gel + thinners) to pre-paint the prosthetic are there any other methods I can use to achieve a realistic blend of silicone and real skin?
Would I need a blending palette to blend into my natural skin or can I use conventional makeup foundation?
Mel
Pingback: Misconceptions and Facts: Lies and Truth About the Business of Modeling
I’m doing my first big SFX shoot and I found this super helpful, I’m building all my own prosthetics for a half body dark siren shoot and this filled in alot of blanks for me, Thanks!
This is great! Thanks guys, love this place!
Greetings! I teach a prosthetic makeup at a Community College in Southern California. I am always looking for a great way of showing my students the importance of edges We do foam latex). This previous article does it! As was said earlier, Todd’s book is fabulous, but I have a very difficult time getting my students to read it until they have finished the class. I would love to show them this article, but want to make sure it is credited properly. Can you let me know how you would like me to do that? Thanks so much! -Jeanine
Hi Stuart, great article. I’m curious if you’ve ever tried reusable, self sticking silicone appliances, first introduced by Gordon Smith? He utilizes the very sticky quality of the deadened silicone as an adhesive back and alcohol releases the appliance for another day. I’m very curious how effective this technique would be with larger wrapping appliances rather than smaller appliances. Any insights regarding this technique before I delve into my prosthetic project? Thanks in advance!
I can’t imagine getting consistently good edges with appliance which were always sticky. Maybe larger pieces could work, and then smaller appliances with perfect edges would be used to fix any which needed to be perfect. I don’t know anybody that actually uses the self-sticky technique. If it could be worked then I suppose it would be an amazing idea, saving a lot of casting of appliances!
Pingback: Making Flat Pieces | Earth Keeper Fmp
Stuart:
Great tips.
I have a challege. I need to blend the front edge of a clown wig that is like a bald cap. The front part around the forehead and front of head is made of material which is double layered and stitched. It forms a seam over the forehead that needs to be blended. The lower part of my forehead and face are covered with a foam latex prosthetic.
How would you recommend blending the seam of the wig accross the forehead against the prosthetic on the forehead so it looks natural and real.
Thanks.
Norm
Hi Norm…can you take a clear photo of the wig front (preferably on but if you are shy about it just a clear shot of the wig front) so I can see what you have and how best to hide it.
Email it to mail@learnprostheticmakeup.com.
Regards
Stuart
I would LOVE to know the answer to this question! I have the same challenge ahead of me…
hey, just found this website (maybe you’ve already seen it), but thought I’d share anyway.
http://www.sciencephoto.com/
they have some real injury references and information about them (how they get treated and heal etc) – can be useful.
Hey Anastasia
I hadn’t seen this, but there are some great images. Thanks for sharing!
-Stuart
Amazing work you have been doing with the tutorials. just working on some prosthetics and this is quitte a big help, your tutorials and Todd’s book is better than most of universities!!
Yay! Thanks – Todds book is the best!
-Stuart
I bought a latex appliance, not foam though, and it has thicker edges. I was wondering if you knew a way to thin the edges.
Hi Griffin
To be honest, thick edges on a latex piece are tricky to get rid of before you apply it. Foam and silicone can be snipped gently on the reverse side to create a better taper using small and sharp scissors, and then filled with bondo or cab-o-sil filler. Latex appliances are usually a bit too dense to do this easily however.
You could apply it and fill the edges with filler or layers of latex, build up gradually and drying between each layer.
Or else you could try is cleaning the thing with 99% alcohol and then apply it to a flat, non porous surface using latex. Then, gently build up a few layers to ‘make’ a new, tapered edge. The last layer could overlap onto the top side of the appliance, and you should be able to talc this when it has dried and carefully peel this off. Apply as normal then simply fill the adge once on the skin.
Failing that, make a mould of it (or sculpt a new one) and run your own piece, making sure you do so with better edges. That is a bit of an overhaul!
Any good?
-Stuart
Good article Stuart- you are a great asset to the teaching of all this rubber nonsense!
Hey Paul
Thanks for reading!!! It is nonsense, isn’t it?
I really enjoy writing this stuff because you can really think through how to do something well. Unlike the actual job which is a mad dash to the finish sometimes.
-Stuart
This very good. I am inspired to do more by seeing and reading this awesome not – but why don’t we try our hands on black skins. Working with black skins is quite difficult if you have tried it before. Hope to hear from u soon. Good work done.
Hi Richardson
Thanks for checking out the post! As a working makeup effects artist I stick bits of rubber on all colours of skin, and I find that darker skin is actually a little easier to colour match.
I think the same principles apply regardless of tone, just that base colours need to be slightly lighter and used as the highlight with the application of shading done to create contouring. Applying highlights to darker skin tends to make the paler colour appear more opaque, as it becomes apparent that the colour is sitting on the surface in a way that shading does not.
In the Awesome Latex Ecourse, I actually cover application on darker skin but you raise a very good point with the blog posts and tutorials.
As I am mainly squeezing these tutorials hastily into my evenings, I have been using my own hands as they are convenient. However, that does not really help people who want to see tutorials on darker skin done here!
I will definitely be doing a tutorial on darker skin asap, and put that up here when it is done! Thanks again for checking my site and for getting in touch!
-Stuart
“Practice screwing it up, then try fixing it.”
Story of my life. Great tutorial Stuart. LOVE the close up of the silicone piece. Clear images leave little ambiguity when dealing with these types of problems. Thanks for making a TOP NOTCH guide that is sure to become an essential reference for anyone who does prosthetic makeup for fun (and of course, those lucky enough to actually make MONEY doing it).
Thanks,
Howard
Hey Stuart,
That’s an awesome blog. I am just about to move on to prosthetics. Starting with pre-made gelatine ones then making my own so I can use gelatine blender for those edges. This blog however, prepares me for when I move on to making silicon and foam latex prosthetics. Cannot wait to start putting everything I have learnt into practice.
Hi Anthony
Actually, little blender appliances are great ways to get rid of issues that crop up in a hurry. I checked out your site, and I remember my first Freddy! I also have (still) my VHS copy of Making of a Nightmare 4, and it had Howard Berger applying the Freddy makeup (the redesigned Kevin Yagher version).
I saw Howard at IMATS this year and talked to him. I had to tell him about that, and it was utterly cool meeting the ‘B’ from KNB finally. I met Greg Nicotero a few years ago when I applied some zombie pieces for a Land of the Dead screening at a horror weekend in London. It was too cool for words!
Thanks for reading the post – I appreciate the support.
-Stuart
Thanks for the info I’m just starting off with prostetics and make up (ok quality ones) and this will help greatly. Although have a question. What do you recommend to blend a “Poorly” produced prostectic like those you can purchase as premade wounds for moulage? Wax, foam, ect…..
Thanks keep them comming.
Dean
Hi Dean
Thanks for your great question…what do you do if it isn’t your fault…the appliance came with a bad edge!!!
I have emailed you a fuller reply, but essentially:
Filling bad edges can be done with the filler I mentioned, and can be bought pre-made in professional makeup stores. Here is one I found which should do the job if you haven’t the components to hand (and frankly, who does?): http://www.naimies.com/catalogsearch/result/?q=cab-o-sil
You can also use latex stippled over the edge, eyelash adhesive or just make a much larger piece which can be used either under clothing or at least the edges get positioned much further away from the wound.
Bad edges on pre-made appliances can be reduced by snipping away on the reverse side to create a thinner edge and then filling what still remains. The really plastic, vinyl wounds are not going to blend very well at all – this snipping technique will only really work with latex, foam latex, silicone or gelatine. Failing that…blood! Lots of blood.
Kind regards
-Stuart
Wow stuart ! I can’t even explain how great this is to have all of your tutorials and now this one, to use and learn from. You sir are an amazing person and thank you.
Hey, Stuart, thank you for this essay! 🙂 these are the things that can make your life easier and help to avoid unnecessary trial and fail (not that it’s bad, but takes time!) and if any of that may seem obvious after one has read it, your post can explain what one could have done wrong. Also well done for writing up and explaining how to get great edges – the task not by much easier than actually getting those edges right!
X
I’m stealing this for the book! 😉
Toddy! You’d better!
Thanks for checking it out!
-Stuart
thanks stuart great blog , very helpful , i only do prosthetics for my own halloween fun but your blogs and tutorials are very helpfull as i want to try make my own facial prosthetics .
Thanks Stuart, I had to quickly blend edges in tonight of Zombie pieces I made for a film school I attend- I had less than an hour to complete 4 zombies.
The school is run, scripts written and directed by Tim Daniel Clarke, who was lead alien in Mutant Chronicles, which I believe you oversaw all prosthetics on, and was involved in the casting of the pieces.
I am really happy to be receiving your tutorials and will put all I learn from you to good use.
Thanks so much,
Jules