
 Cap plastic is big.
…and it’s not just for bald caps.
Cap plastic is so called as it was originally pretty much used only for making bald caps, so those with hair could temporarily be without it.
Over the last ten years or so, it’s used much more widely as an encapsulant or barrier in a mould so that when silicone gel appliances are cast into it, they come out of the mould with that cap plastic as a surface. This allows glue and makeup to remain attached to it – after all, silicone is at its best a mould material because almost nothing sticks to it!
Check out our podcast all about it here:

A plastic head form used for making bald caps.
Cap plastic is essentially a soft plastic melted down into a solvent, usually acetone as it is easily available and evaporates quickly. This material would be painted onto a head form (such as a plastic ‘redhead’ from Kryolan) in several layers and when dry, the resulting skin is powdered, peeled off and used.
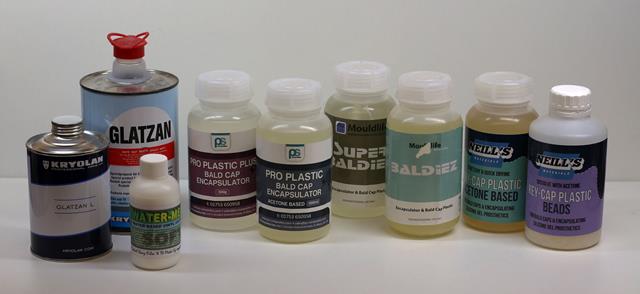
Edges could then be blended using more acetone as required and the result was a decent custom fitted cap which could be painted like skin to create the illusion of a bald head. Well-known brands include Glatzan by Kryolan and Baldies by Mouldlife.
Over the years as silicone began using cap plastic as a barrier surface, it made sense to try and find a less aggressive solvent if one were to be using it on parts of the body other than the hairline – say around the nose or eyes when appliances have edges finish around there. These are sensitive areas and previously not regularly presented with solvents to melt off plastic edges.
This led to alcohol based plastics, such as Super Baldies (Mouldlife) and Pro Plastic Plus (PS Composites). Now cap plastic barriers could be melted with the far less volatile alcohol solvents. Some care must be taken when using alcohol activated makeup on alcohol activated cap plastic, but despite what may seem like an obvious problem it works well.
The trick is to not move the cap plastic which may have been temporarily reactivated by the alcohol. Flicking and dabbing with brushes reduces contact, and reactivated cap plastic will simply evaporate off the solvents but the plastic will remain in place – bit this is probably best for a dedicated blog post about painting on cap plastics.
Hazardous?
Lets be clear – you should not apply this stuff directly to skin. It should always be applied to a surface and allowed to completely dry before being used as a dry film!
Cap plastic typically comes in a thick concentrated liquid form, and ideally is thinned for use with the appropriate solvent (acetone or 99% alcohol accordingly) and can be painted on with a conventional brush or airbrushed. Because Cap plastic is sold usually as a liquid – and the solvents are flammable – shipping overseas is especially tricky as it would be classed as hazardous for transportation purposes.
This can be an issue if you are having to get your cap plastic shipped overseas from its country of origin. For this reason, Neills Materials stock the plastic in its raw bead form, and this makes shipping it much easier.
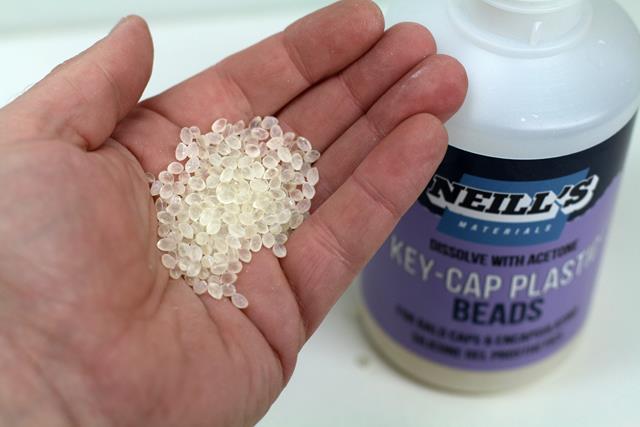
You simply add your own locally sourced acetone and reconstitute the material yourself. The beads even come in the correct bottle size for the amount supplied so you won’t need to find a suitable container!
When using cap plastic, always ensure you have the relevant health and safety information, data sheets and make sure you understand it before using. Ensure you have sufficient ventilation/extraction/respirator to work safely.
Thinning & application
Cap plastic is usually a honey like consistency and too thick for most practical purposes. If applying by brush, it can be thinned (this is my way anyhow) about 2parts solvent to 1 part cap plastic. This gives a more fluid mixture to brush into a mould surface, and allow each layer to dry fully before applying another. The only issue with brushing in using a conventional brush is that it naturally deposits a thicker amount of liquid than an airbrush would. This is especially true in deep recesses. You may easily cause pools of cap plastic mixture which will take longer to evaporate.

BALDFX from Motion Picture FX.
This may be an issue for hard mould surfaces (plaster, stone, resin for example) as this increased evaporation time – even a few seconds longer – may cause the solvents present to etch into the mould surface.
This means upon removal of the appliance later you may find the cap plastic sticks partially (or totally) to the mould rather than you silicone gel.
I see many cries of ‘cap plastic stuck to moulds’ in forums and facebook groups and almost every time it is the result of a combination of brushed-in cap plastic and rigid mould material. Silicone moulds do not tend to have cap plastic stick so readily to them, but still be careful and try to avoid ‘pooling’ too much cap plastic.
How heavy handed you are is a factor in final thickness. Someone who dips a brush once and tries to spread that load all over a mould surface will deplete the brush quickly and lay little cap plastic. Another person may dip the brush and wipe one stroke before re-dipping, wiping back and forth progressively and thus using far more cap plastic. Both believe they have applied a single layer but to different effect.
Airbrush
If applying using an airbrush, you will need to thin it with more solvent for it to actually get through the nozzle – usually around 4 to 6 parts solvent to 1 part plastic. There are many variables that affect exact amounts, and there isn’t one definitive way of doing it. I personally prefer about 7 parts solvent to 1 part cap plastic and about three to four layers.
See cap plastic being sprayed into moulds in these videos: flat moulds sprayed and brushed here, and also fibreglass moulds being sprayed here – skip to 12:40 to get to the cap plastic stuff.
However, your needle size, spraying pressure, distance from the mould surface and how slowly progress across the mould surface will all have an effect on the final cap plastic thickness. Spray beyond the edge of the mould so you can be sure the thickness is consistent everywhere and you can check at intervals around the edge with a pin. Obviously check on the flashing, outside of the actual appliance itself – you don’t want to damage this precious membrane! Lift the cap plastic with a pin and check for holes. As soon as you have several areas checked and noted as ok, then stop spraying!
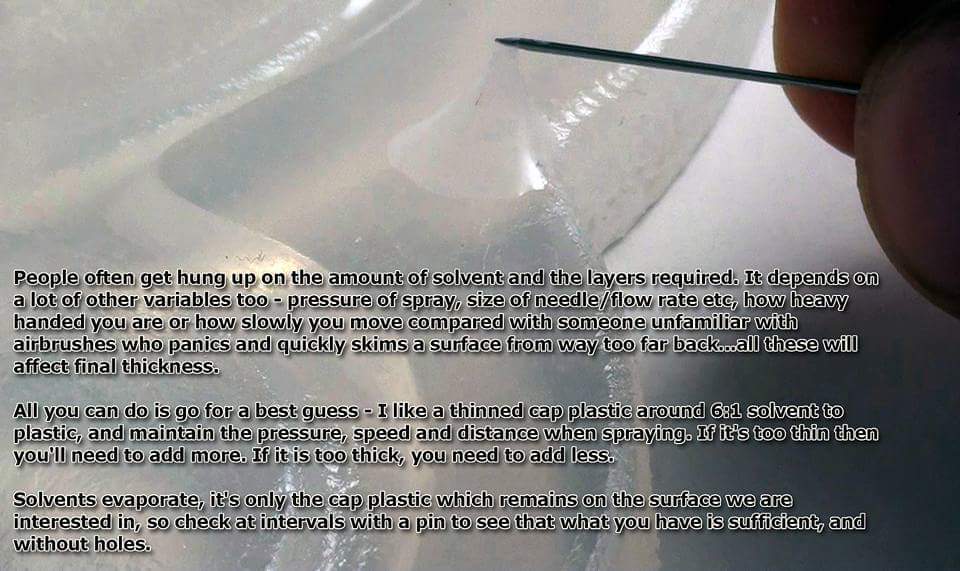
The idea is to have as thin a workable surface as possible. As soon as you have that, leave it for an hour before filling with silicone. Cap plastic toughens with age, and if you lift the cap plastic as soon a s it is sprayed, it may feel very soft. If you mistake this for being too thin, then you may add many more layers and the following day you will come back to a piece with edges as tough as wellington boots. Check for holes. As soon as you have a surface without a web of holes, stop spraying and leave it to mature.
Accept you will likely need to run a few appliances before you get your thickness perfect. Keep track of your solvent ratios, mark the bottles and ensure the solvent can’t evaporate when you are not using the cap plastic! Keep note of your layers, and compressor pressure etc. You will get a feel for how you work, and then you adjust accordingly.
I personally would rather apply more thin layers and be confident that I have not missed anywhere than try to do it all in fewer passes only to find a section was missed, and only is this revealed after the piece is demoulded (taken out) and the process must then be repeated.
Pooling!
One phenomena you need to be aware of when applying by brush is how, as a liquid, the cap plastic will settle into thicker pools in the recesses and therefore is thinnest on the high points (see illustration).
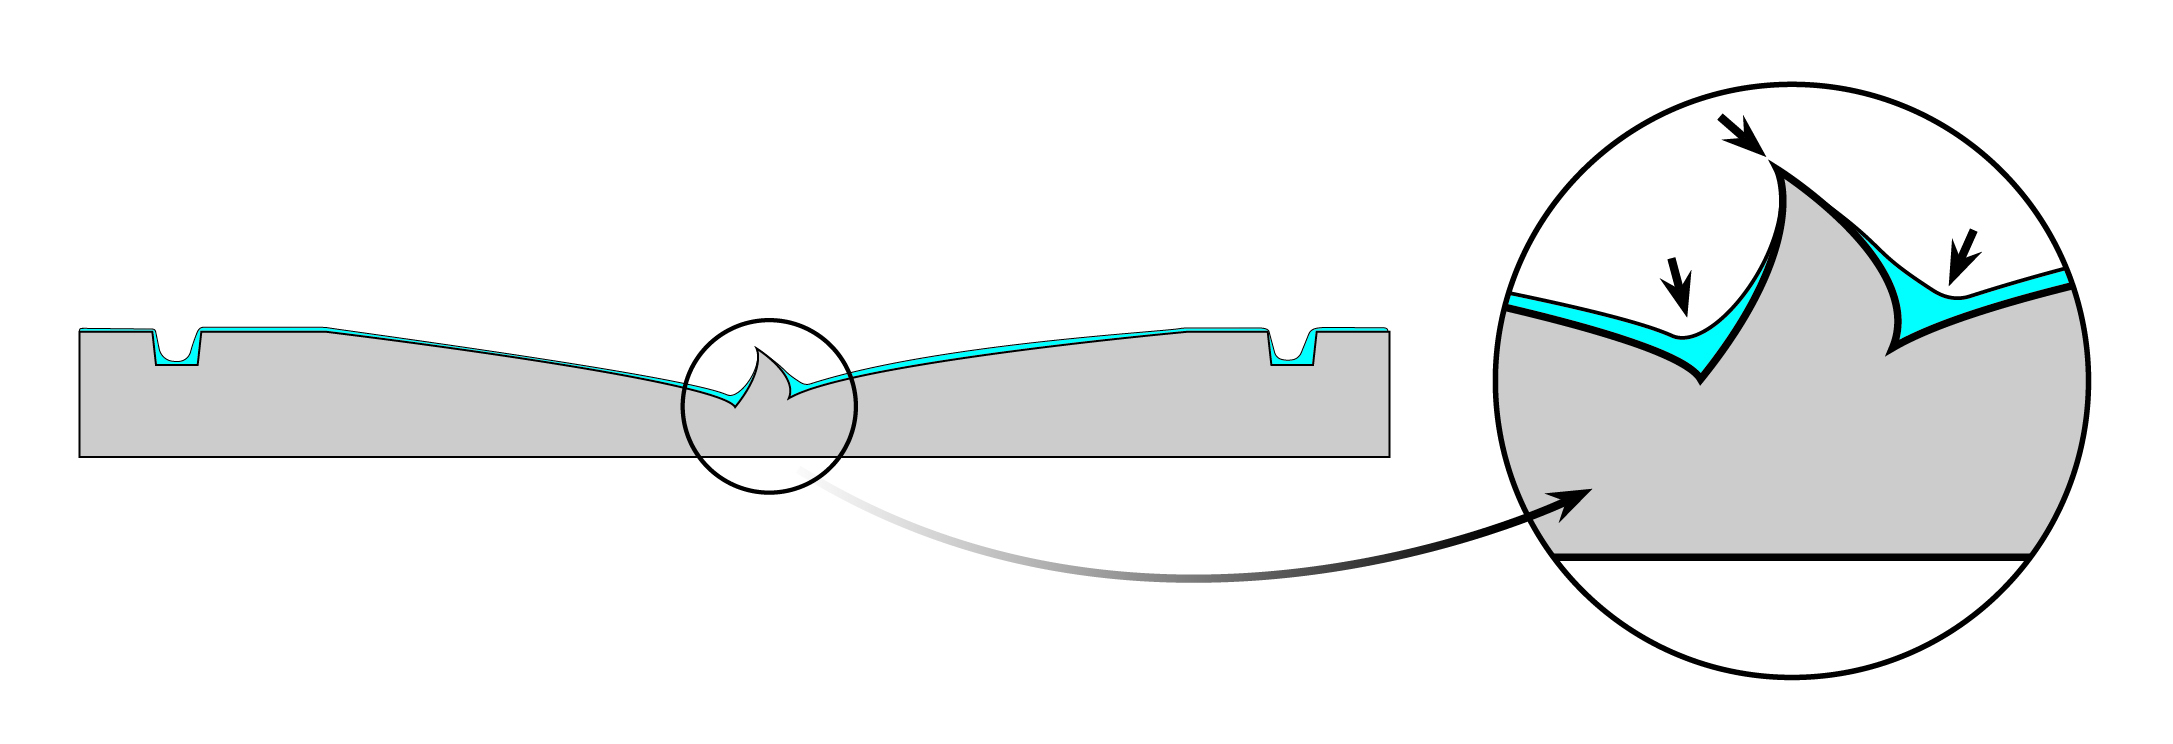
This means these high areas will have almost no cap plastic and consequently, the finished appliance may have holes at these points or tear more easily. Bear this in mind and perhaps apply another couple of layers carefully just on these areas to help reduce any issues.
Conversely, when airbrushing (see illustration below), you tend to get an even finish as it evaporates almost instantly, allowing regular even thickness over an undulating surface, high points and all.

Sometimes you will accumulate ‘cobwebs’ of cap plastic. This can be caused by too high a pressure or insufficient amounts of solvent. You may find warmer temperatures increase the likelihood of this. Tapping them away with a solution of your thinned cap plastic should melt them away, although minor cobwebs are not an issue for the appliance.
Cobwebs can be melted away using a solution of cap plastic. This will replace any bare spots left by melting away.
Getting used to the material is key. If in doubt, do some tests runs and get familiar with YOUR kit, how heavy handed YOU are and how YOUR compressor/brush/nerves handle it. That way, by paying close attention to the results, you can more sensibly amend your approach to correct the issues in a logical manner. Trust us – we know exactly how it feels!
‘Til next time. As ever, comments below or on our facebook page are always gratefully received! If we helped you with something, we love to know. If there is something you’d like to know that wasn’t mentioned, again…let us know!
– Stuart & Todd
hy
Thats a great explanation thank you for taking your time to explain this so well! I do wonder if Glazan from kryolan could be sprayd with the airbrush to make encapsulating of silicone. Online everyone talks just about brushing glazan and making bald caps. So i wonder if its spayable an suitable for this prupos.
thanks
Hi! I spray glatzan with airbrush and always works fine
Thank you so much for your explanation! I couldn’t understand how to get rid of the damn cobwebs. Doing all this in a hot climate. I think I have been too heavy handed. And ratios all wrong. Cheers brother!
Hi All,
I was told by a make-up artist about Super Baldiez for attaching lace-back facial hair, which I used in Westworld and the new Tarantino movie. But he didn’t have the details on use, not could the counter person at Nigel’s tell me how to use it. Is there someone who can explain? The manufacturer has not answered my inquiry. Thanks.
I was wondering how long you can keep cap plastic in its liquid form before it expires? I have some that I bought in 2016, will it still be okay to use now?
Thank you for your easy to absorb explanation. Since this product isn’t available in my country, do you have any ideas for the substitution? Or can we make it by ourselves and what are the raw materials?
I believe you can buy the ‘beads’ of bald cap (which is the raw product), and then add acetone. Here’s an example:
https://www.neillsmaterials.co.uk/product/key-cap-plastic/
“If you like our Key-Cap Plastic and are based outside of the UK, why not try Key-Cap Plastic Beads for a non-hazardous shipping option.
Our Key-Cap Plastic Beads are the answer to hazardous shipping headaches. They are the exact raw material we make our liquid Key-Cap Plastic from by dissolving them in Acetone. Now you can buy the beads in the container with instructions as to how to use them by filling with Acetone yourself, avoiding the issue of Acetone being highly flammable and thus very expensive to ship.”
Johnson wax is for floors right.Not cars.
Nice one gentlemen…
Lots of good stuff in there..
Always great info. What rigid mold material do you prefer for running silicone prosthetics? I’ve tried a variety but obviously not everything!
Small things can be done well in urethanes like Easy Flo 120 or FC54 but Epoxy is lovely too. I have also used fibreglass for larger pieces as it’s so light.
Ah so that’s why it didn’t come out the mould easily Cheers for the info. Always easily explained.
Great article. I find this very useful and you have cleared up a few things for me… like how to get rid of the webbing and explaining that it doesn’t really hurt the end result, if they are less extensive. I have been tossing it out when I get webbing… wastes a lot of material, time. Thanks again!!!