
Frankenstein’s Creature – Take 2
 A few years back, I had a lot of fun making a Frankenstein’s Creature for Jai Sepple, who was starring as the tortured soul in a stage production (check out my old blog series on it here if you haven’t seen it).
Well, three years on and they want to stage it again. This time, however there is less time and they have their own theatre…and the action happens right up close to the audience so edges are more of an issue than the previous version.
So I figured make it in silicone, so the colour and translucency is there…maybe add some hair this time to help the back out a bit, and make some blender pieces to hide the edges of a big appliance which will get used more than once.
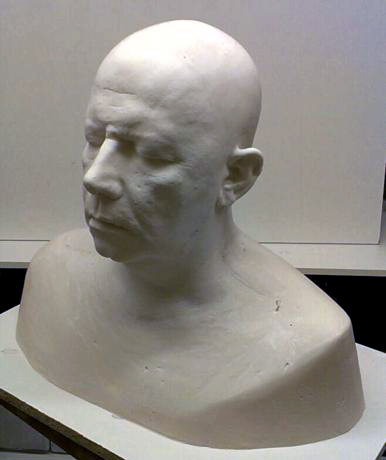
I started as before with a lifecast. We had the previous cast but I wanted to make an up to date one, and as Jai is still bald, we got a great copy of his actual head rather than a shaved-down baldcap which is what usually happens.
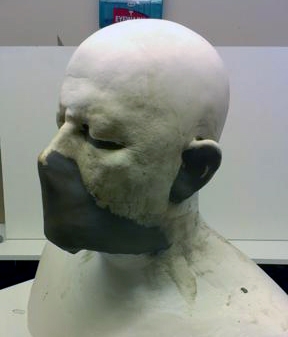 I didn’t have time to make a lovely silicone mould so I instead opted to make a quick urethane resin core from an alginate. So, first up I clay out the undercuts on the face all those areas where the appliance will not be on the face, and where there are pesky folds of skin such as lips, ears and nostrils.
By claying these out so the details here is minimised, the resulting core will be smooth in these areas where I can put keys/bolts etc.
I used alginate because it is relatively cheap and very quick. Alginate rips easily, which is another reason to take out the unnecessary details now in clay so the face is a smoother shape, so it pops out more like a wet pebble instead of a dry hedgehog. I don’t need the details here as I have decided the appliance will be a head appliance like a cap.
Once the alginate has set, I put a two piece plaster bandage case on and allow it to firm up while I brew some awesome coffee. Two cups later, and I need to split the alginate to get it off the head. The least damaging place to put that split is up the back, and it all seems to come away nicely with minimal damage to the delicate alginate. Popping the alginate back into the bandage jacket, I can now start to make the core.
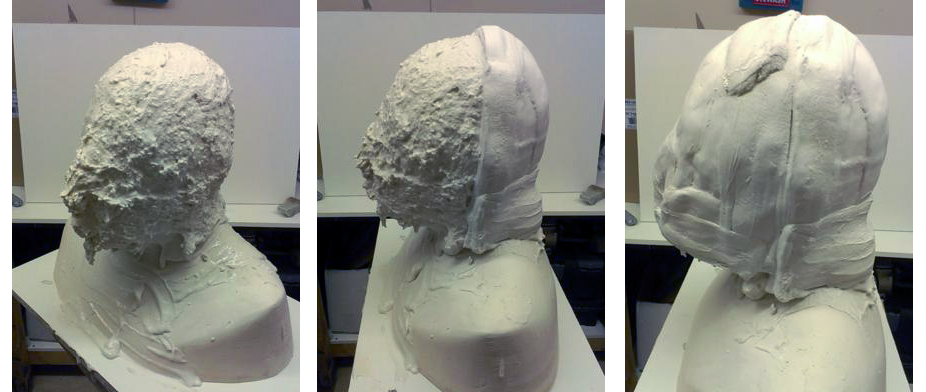
I want a quick core, so I opt for fast setting urethane or ‘fastcast’ as it is commonly known. This resin is a two part liquid, which when mixed together sets rapidly to a rigid, white finish. It is notoriously averse to moisture howver, and guess what half the alginate is made up of….you mix it with water!
To offset any issues (this is a one hit wonder), I dry the alginate interior by swilling it with acetone to pick up any remaining water drops and it then evaporates quickly with a hairdryer. I then mix the first coat of resin and wait for it to get really warm, so it is closer to actually setting, before pouring and swilling into the alginate. That way, it is in there as a liquid for less time. Two minutes of swilling later, and it has set solid.
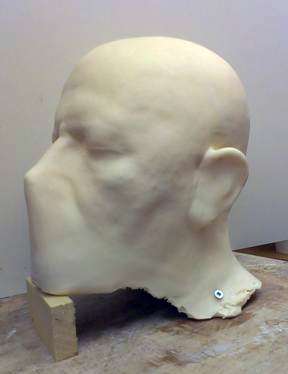 Another eight coats, and we are ready to leave it overnight and see what the deal is. Thankfully, there were no issues and we have a grand looking core, with the main undercuts taken care of, making it much nicer to be getting moulds off later.
I screw it down onto the sculpting stand so it sits at a good angle and won’t shift whilst working. You can see now how the clay has made the face a much nicer shape to be making moulds upon. The mouth area is not having any appliances (they will be singing a loooot, so I don’t want to mess with the mouth area).
Next job is to start blocking out the sculpt. As before, I like to melt the plasteline down in a pan and paint the first coat on, slapping on the soft oil based clay until it gradually cools and solidifies into a rough shape which can be carved back.
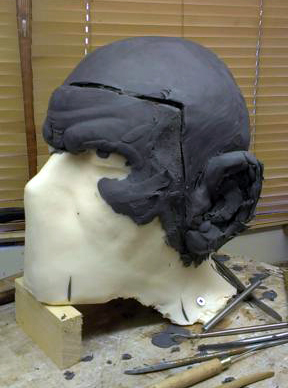
The blocked out sculpt is nice to carve into.
The head was deliberately asymmetrical last time, and as a device it worked quite well. I wanted something that was clearly visible from a distance, and the combination of corpses that went into making the creature could justify two skin tones on the stitched-together parts.
To that end, I repeated the gag of having one ear larger than the other, as this is part of another head which has been used to repair the damaged noggin of the doomed beasty.
By having the head like a cap, I could have horizontal seam running across the head above the brow, so there could be a little nod of the Jack Pierce ‘flat-top’ look that Karloff has without actually giving it a flattened top. There are no bolts either! After a while, I realise that the ear on one side is not needed, so I take a hammer and chisel to it, and chip off the unnecessary lump, filing it smooth and repairing the sculpt around it.
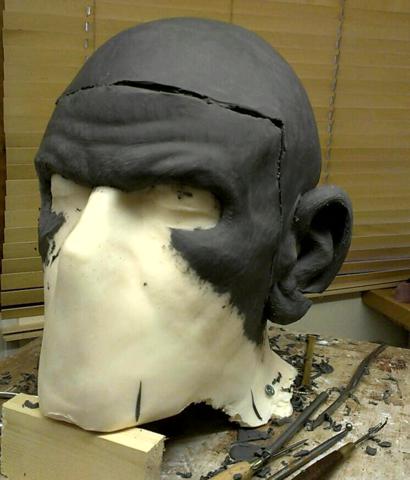
As edges are always an issue when sticking bits of rubber onto a face which sweats, sings and eats greasy food, I decide to finish the piece in places where it will be easier to hide them (in theory).
The back of the head will be haired, but even so the sculpt finishes high up, at the point where the skin folds when he look up.
The brow is slightly lower, and returns slightly so it finishes as a harsh line rather than a blended one.
The side with the ear has an edge underneath the lobe, so I make it a bit ‘stitchy’ there so redness will be able to help (did I mention I have a ten minute makeup time?). The side without the ear follows the line where his ear meets his head, so hopefully that won’t be obvious. Where the appliance is finishing on the cheeks, I will make small flat blender appliances which can replaced each time. This will have a pure silicone surface which is more durable, and the blenders will have Super Baldies cap plastic barrier, so they can be cleaned off after each performance and replaced.
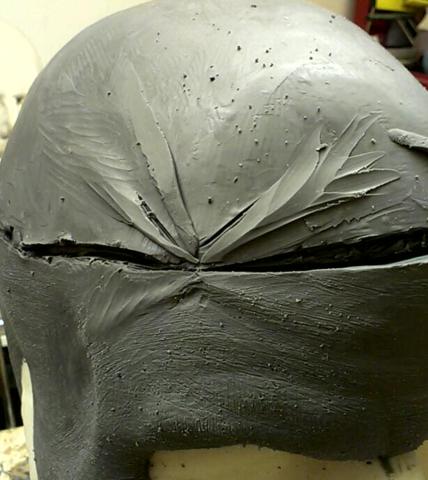
At this moment in time, I have just started the folds of skin caused by hasty stitching, and this is where I stop work for the day. I have made a short video (below – shot on my ‘phone so apologies for quality) which gives you a 360 degree view on the turntable, and I will post more tomorrow night!
I basically have to finish this by the weekend, so will post as it happens. (I tweet pics as it is fast to do when sculpting so check out my twitter account for live updates).
——————————————————-
Thanks for checking it out – will keep you posted!
-Stuart
Hi Stuart, great project. Will it be in silicone this time?
–
A little question about the resin. Wich one do you use?
Is it the same Ren Cast 52 you used on the Imats-Make-up?
Thanks Steve
Hi – nope, this is Fastcast from PS composites. I didn’t have any fillers, so it took a while longer to make but the fibreglass mould was quick.
-Stuart
Pingback: Frankie 2 Prosthetic Sculpt | Learn Makeup Effects