
 The last post looked at the claws, horns and nose from a BBC TV comedy show.
This post will look at the last couple of gags from BBC TV’s It’s Kevin, with Kevin Eldon.– the oversized moose antlers from a sketch ‘The Incredible Moose Human‘ – a superhero who grows moose antlers when enraged by injustice.
There was a set of horns/antlers made and then production wanted to increase them even more. Eventually they were about 4 feet wide (48″ or 1.2 m wide) and he was to wear them whilst walking through a china and glassware store, shelves precisely level with the antler for maximum effect when how strode down the aisles.
We started with a cast of Kevin’s head, which was supplied by Waldo so no need for a new lifecast to be done. I fitted out a plaster copy with some copper tube, wrestled from my old plumbing kit. A wee bit of bending and soldering, and I was able to hook up a basic ‘U’ shape handlebar that would make up the majority of the armature.
We can’t have it bend halfway through the sculpt or mould! A strong armature is essential. The head form is sitting on that steel armature used previously for the claw!
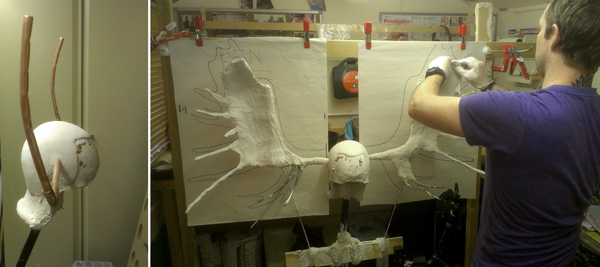
Some may think trusting this lofty responsibility to the fickle mistress that is copper is in itself a gamble. Granted, that was a risk, but I trusted myself to the magnificence of tubular support. Next up, we built a rough shape of the main extending ‘fingers’ of the moose antlers using a scaled-up outline based on the design from production.
This was fleshed out with chicken wire and then coated with plaster bandage to create a lightweight shell. We went crazy with shellac, making it shiny and water resistant so the thin layer of clay we would skim on top would not dry out too quickly.
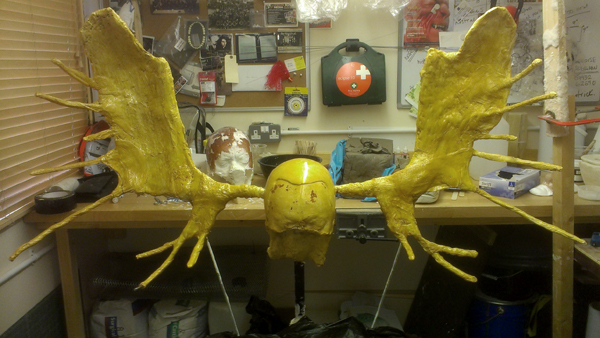
Nice, shiny and yellow. Both the antler armature and some M&M’s have these qualities.
I could have used plastiline instead of clay, but its so much quicker to use clay for something like this. Plus, I knew we had a fair amount of moulding to do after so I though anything that would speed up this part would be good. Which is kind of a shame, as this sculpting is often considered the fun part (unless you are a third mould-maker like me) and therefore not the part you’d want to cut corners on.
However, the mould is not something that can be done badly or hurried – it has to function and behave itself so the lions-share of time is usually never the sculpting part! It’s all the other stuff.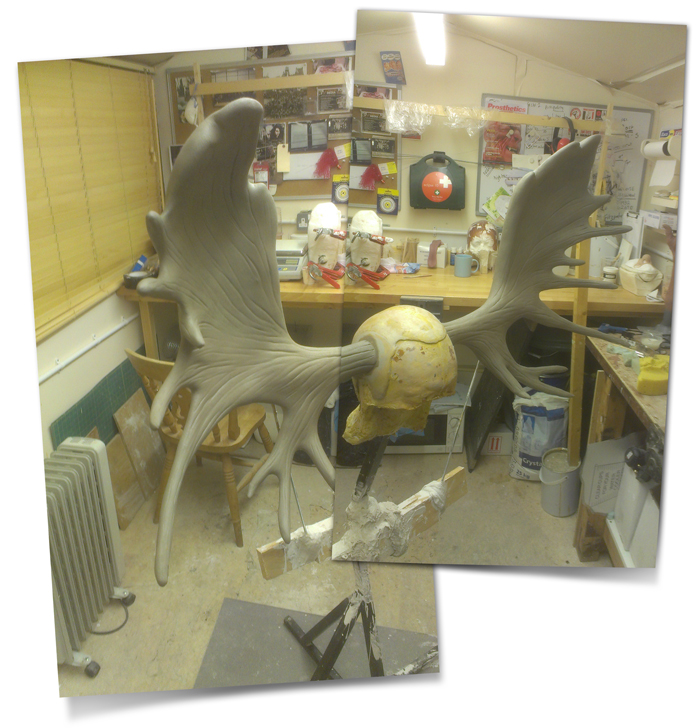 They needed sculpting them ‘in situ’ on the head, as the fibreglass scull cap was the centre of the whole thing. It had to be symmetrical visually, strong enough to stay attached and balanced once worn so as not to favour leaning to one side.
Once the sculpt was approved then we made steps to mould it. First instance was to keep it from drying during the moulding part, so we sprayed the whole thing with a clear car spray lacquer.
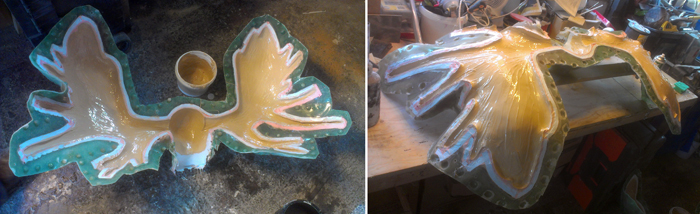
To mould was fairly simple – we painted on several coats of silicone all over. The plan was to make it a two part mould by covering the whole thing in silicone (about 1/2″ (12mm) all over). I decided to make the silicone stay in the fibreglass halves, as I didn’t want the huge silicone moulds flopping about like wet sheets.
To do this, we gave the whole mould a final coat of silicone, then pressed dish-towels into the surface, so the fibres on the back bonded to the mould whilst the upper surface was exposed and would bond to the gelcoat we would add later.
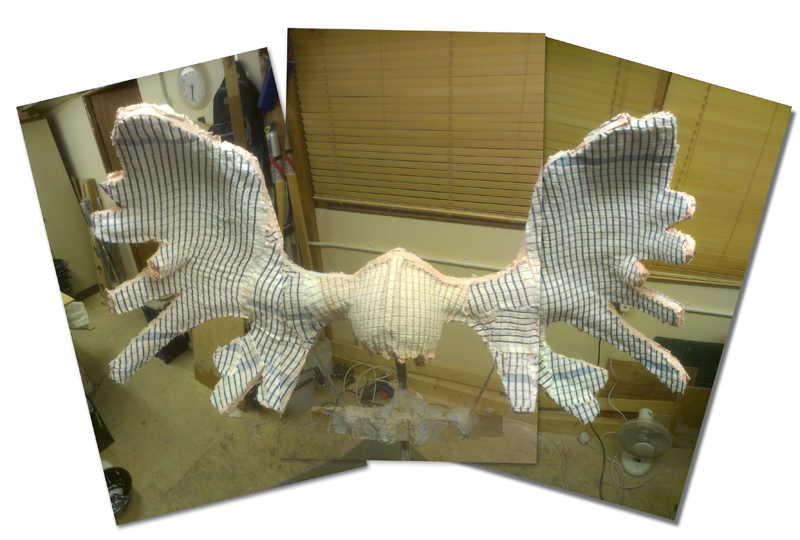
This mould was sliced around the halfway line all the way around the outside edge of the mould. This allowed the silicone to open up once the jacket of fibreglass was added, and also the cut provided a handy slot in which to slide plastic shim. This allowed up to glass both halves at once – a lot of work as it was quite a large surface area but a few hours of toil later and we ourselves a mould of some virtue!
 Once opened and cleaned out I had a buddy of mine help out with the fibreglassing. While we got on with other bits, Edmund Woodward (an incredibly skilled sculptor and mouldmaker) made the one and only set of antlers from the silicone mould.
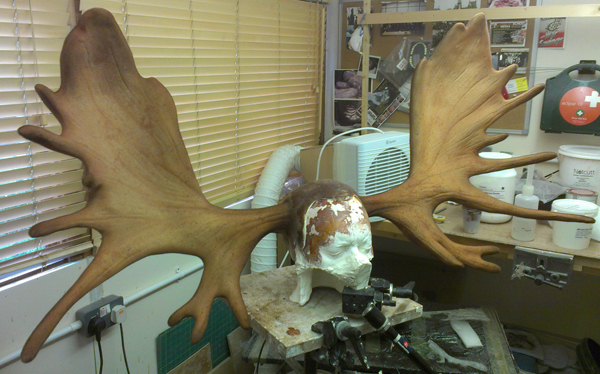
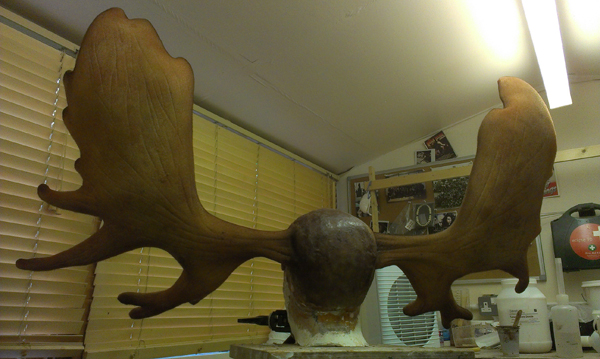
We went for as thin a gelcoat as possible, and backed it up with a single layer of fibreglass mat. The gelcoat is this delightful ‘camel sunset’, ‘Melted Caramac’ or ‘Werthers Unoriginal’. Take your pick – I just know it was a good base colour for the intended paint job whether you like it or not.
Once the fibreglass set was out, cleaned up and seams sanded smooth, I slap some paint on it. I use a mix or Tria inks with acetone as a thinner (they stay well on fibreglass) and acrylic inks thinned with 99% alcohol.
The tips are darkened, and there was some spattering with thin washes to give it a natural breakup. Using pics of real antlers as reference, I mist, spatter and flick colours until we are there.
 One thing with moose antlers is they are kind hairy, with a fuzzy coating of fine hair. To get this, we flocked the whole thing using brown and beige nylon flock and a flocking gun. I needed to get a glue which would hold the flock in place throughout it’s many shots, manhandling and touching.
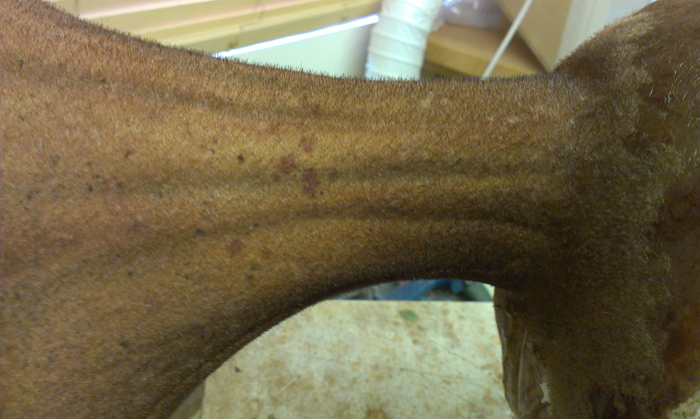
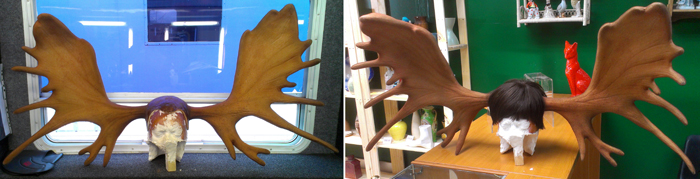
Flocked antlers, fine , short nylon hairs about 1-2 mm long .
Once the makeup department had fitted the wig to match Kevin character, we had a set of antlers ready to go. Check them out.
Maybe you remember my blog posts on making a couple of tongues a while back.
Well, the reason I decided to make that post featuring tongues was the result of previously making the one pictured below. In the show, Kevin s character was a 1980’s doctor who displays a range of over the top reactions to an attractive nurse, ranging from steam coming out of his ears, Sid James-esque groans and a wolf-like unrolling tongue.
 The tongue length was essentially limited to what could comfortably fit within the mouth when rolled up. Imagine a belt coiled up – there really isn’t too much length which can be easily accommodated within the mouth without gagging, unless one has – erm – trained oneself to overcome such discomforts.
So, we decided on a size and I set about sculpting the tongue. The first step was to make a secure armature to support the thin sculpture, and I used some steel strip which could be bent to supply a pleasing curve. I was quite keen to avoid a simple ‘flat’ tongue as I thought that would look cheap and unrealistic.
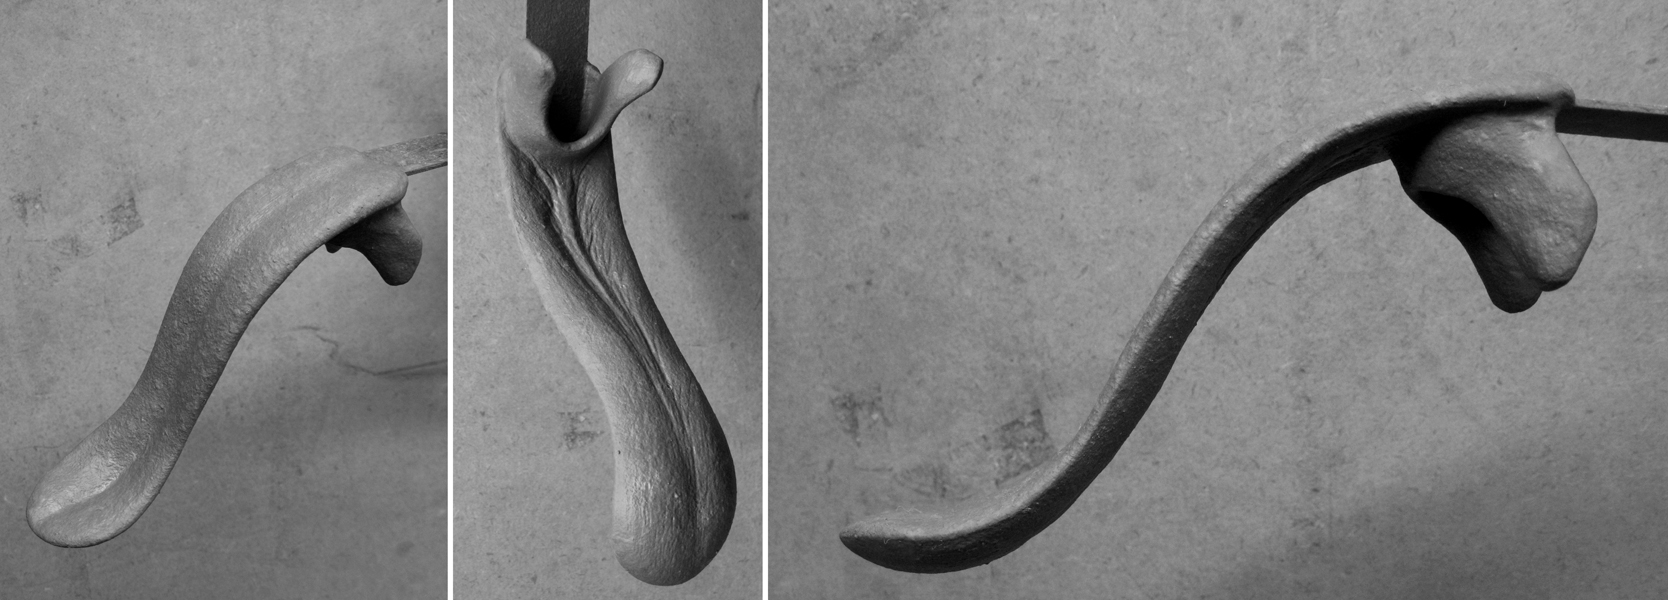
The tongue does look rather unusual viewed from underneath. The protruding lobes at the top end were originally there to help retain the tongue in the mouth by sliding between the real performers tongue and his cheek. In the end, I instead glued them together to form a loop through which the tongue could fit.
(I know what it looks like. Trust me, I see it too.)
The protruding lobes at the top end were originally there to help retain the tongue in the mouth by sliding between the real performers tongue and his cheek. In the end, I instead glued them together to form a loop through which the tongue could fit. By pressing the real tongue against his lower teeth, the fake tongue is held securely in place during the gag with no visible means of retention or glues being used.
There is not much in the way of oral adhesives – a denture fixative maybe but this still would not have held the wobbling appendage with it’s extra weight. Plus, denture fixative is pretty grim stuff to have to fetch out of your mouth.
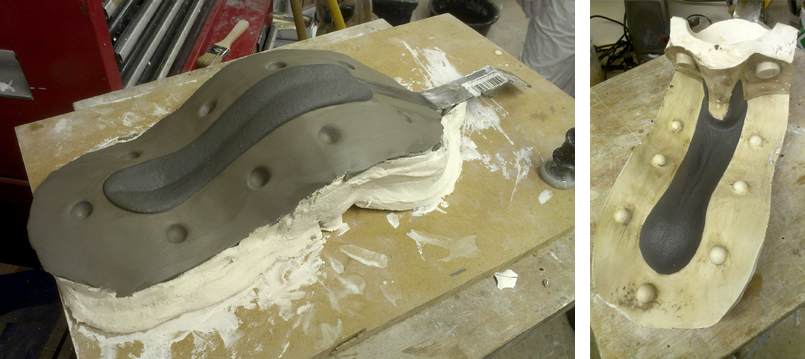
Once the sculpt was finished, it needed moulding. I wanted to make a simple plaster mould, which would happily yield the few casts we needed without breaking the bank. A clay wall was carefully applied around the halfway line of the tongue sculpt, with indented keys pressed into it at regular intervals.
The top of the tongue mould was made in one piece, whereas the underside needed to be in two pieces, to better allow the tongue ‘lobes’ which protrude from the underside at the back, to come out of the mould.
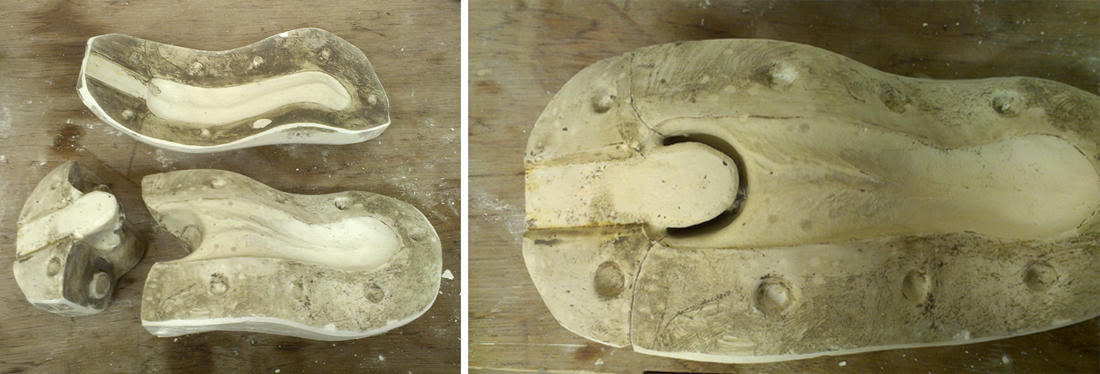 You can hopefully see from the pics above how the two pieces that made up the lower half go together. The resulting seams were minimal and easily trimmed clean with scissors and needed no filling or repair.
See, good mould-making is the sensible option for a happier world.
After some tests with an unpainted cast, it was obvious that the lobes idea wasn’t cutting the mustard. The tongue would often fall out, not being retained properly. Tricky business, as I haven’t had to make on of these before. Still, logically you have few options when attaching something in the mouth simply and safely.
I decided to stick the bottom edge of the two hanging lobes togther to make a tube, into which the real tongue could slide. The tongue was painted with platsil gel tinted with pigments, and given a clear coat of platsil gel 10 as a final shine.
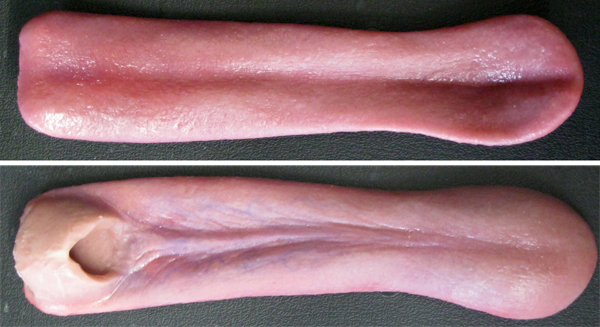
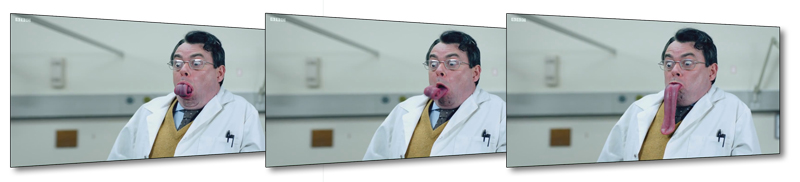
The final tongue from the sketch. Really looks quite unpleasant, really.
A few takes and the shot is done! Huzzah!
Kevin did a great job with it, and it was a pretty punishing schedule. The man does work hard, that’s for sure.
Would you do me a favour and drop me a comment below? I really enjoy hearing what you have to say – plus I don’t really know if anybody is reading this unless you say so.
Until next time!
Stuart
There’s one things you forgot to explain about the antlers–how did the wig fit around them?
We just had a cheap wig which was cut and stuck on.
-Stu
Great look on the tongue. One of my upcoming projects is an animatronic werewolf tongue. It will extend from the jaw and also move up and down.
Those are great! That flocking works really realistic, especially in the light of the workshop.
I have a question about the dish cloths. Do you mean you used them instead of the fibre for the fibreglass? or just to provide a fibrous layer for the mould to hold onto?
hey
I mean the silicone was coated with the fabric so the gelcoat would bond to it. I then used fibreglass as usual to back up and laminate the resin with.
Stuart
I read them! I enjoy seeing how you tackle difficult tasks such as producing something as large as moose antlers while still having it be lightweight, or how you would tackle creating a large, heavy tongue where it’s impractical to use glue in the mouth.
You mentioned you needed a glue “which would hold the flock in place throughout it’s many shots, manhandling and touching” for the antlers, what’d you end up using?
Thanks for sharing your knowledge!
PS, how much fun is it working on GoT?
Hey!
I will need to check my records of the name but it was a two part resin type glue for hard surfaces and it was from the flock supplier, Thomas & Vines.
Stuart
A lot of fun!
looks really good , the clear coat of gel 10 makes it look extra real. the molds look great to. the pictures are really helpfull for mold making. it gave me a idea of getting a cow tongue from the store and making a mold of that. the other one u did of the diseased and cut tongue where great. u nailed the texture on the tongues. i tried a new gel 10 by ps composites, called pro gel 10. it actually pours alot thinner than regular gel 10 even when addeding alot of flocking. its great for deep molds like pouring hand molds.
Thanks for putting these posts up! It’s cool to see what goes on behind the scenes. How many of you were working in the team? I have a few other questions to ask, but I’ll wait till the lifecasting workshop in July…
Hi Rob
It was me and David for the workshop stuff and I had Ed do some moulding and Fibre glassing for me at his workshop.
I also has some help with the life cast from Julia Plant.
Stuart