
 One of the biggest tales among mould making folklore is the curse of undercuts visited upon unfortunate souls who failed to spot them.
I figured it would be a worthy subject to throw some spotlight on and look at what undercuts are, why they are a problem and what we can do about them.
What is an undercut?
Essentially, it is a shape which has surfaces not visible from a single angle. In itself, it isn’t necessarily a problem unless a rigid mould is being made of that undercut. Mould pieces are pulled away from their casts in a single direction, and if that undercut goes the opposite way to that direction, then you could be in trouble.
They can be slight or extreme, and most commonly in FX stuff it is down to the curvatures found in a shapes of the human body.
To demonstrate the principle, imagine for example making a plaster mould of a plaster sphere. In order to get the mould open and make the mould in as few pieces as possible, the mould would need to be in at least two halves, and those would have to be made to meet exactly in the centreline.
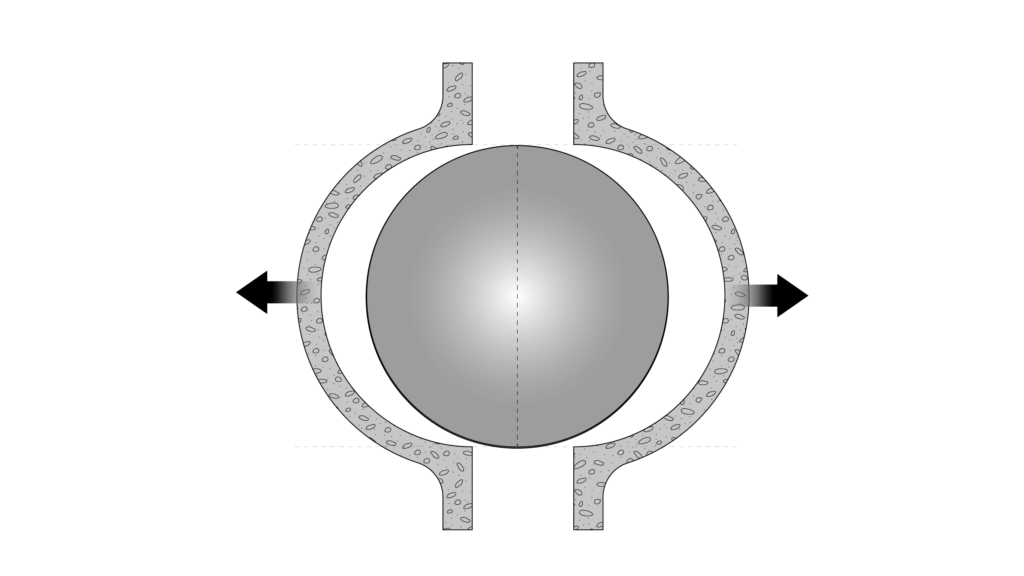
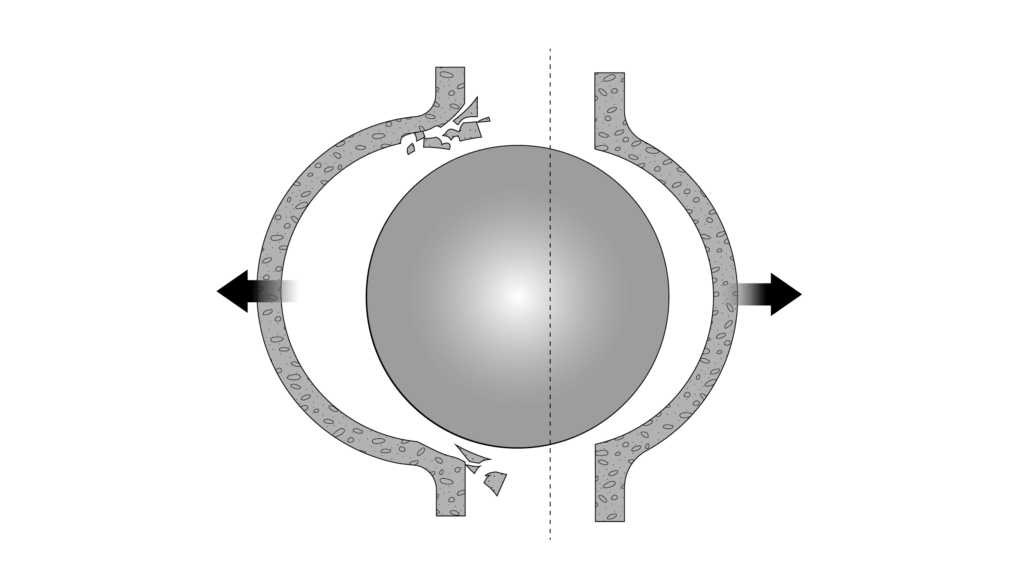
If one half was slightly larger than the other then one half of the mould would pop off whilst the other essentially was locked in, and either the mould or the sphere will need to break in order to separate them.
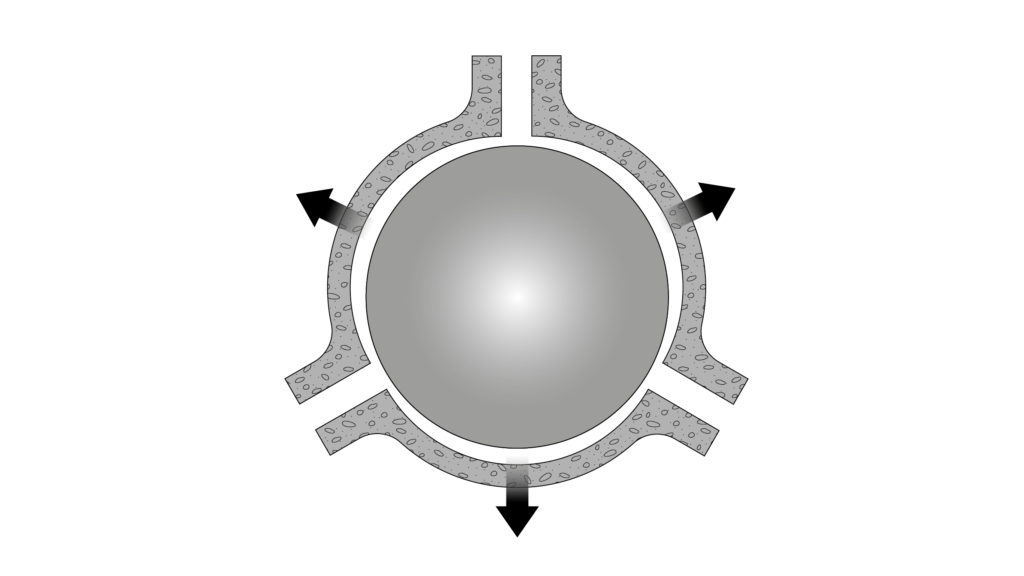
The alternative is make the mould in three or more pieces to make it much easier to open (more work and an extra seamline to fix) or to use a flexible material such as silicone which is able to flex and allow the pieces to separate more easily (extra expense and time). Either way, if there is an undercut then it needs addressing.
Common places for undercuts on a face can be on a nose, where the wings of nostrils flare out and then return to meet the cheeks and top lip. It’s possible a nose may have a more obtuse angle here and consequently present no undercut, but often this is not the case.
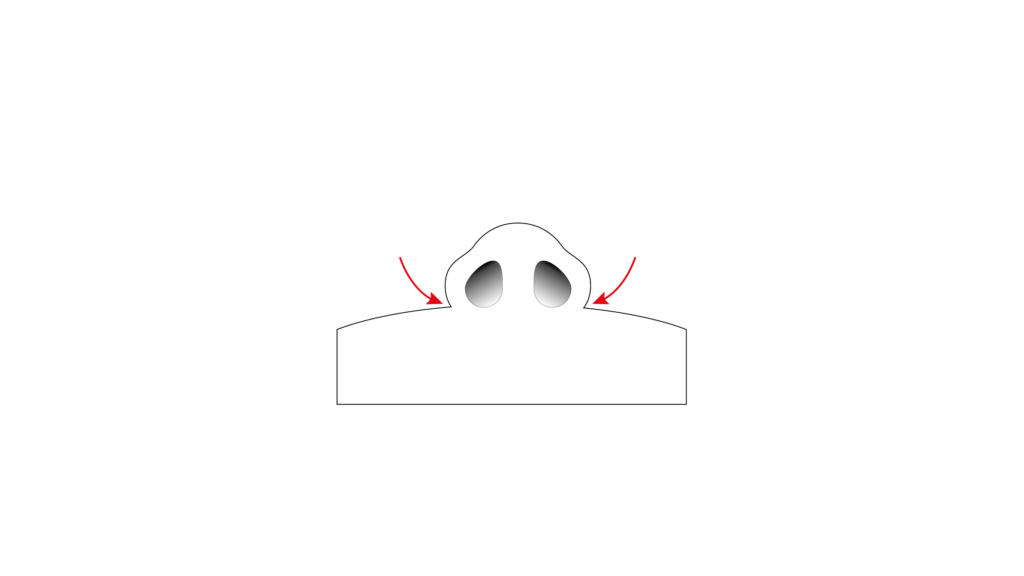
Even a slight undercut can cause rigid moulds to lock with something having to break in order to open the mould up, likely ruining the mould or pieces made from it. If the mould does finally open, then the broken areas will be seen in pieces cast from it.

Things than go ‘inwards’ on a positive such as a face cast will come ‘outwards’ on a mould of it, and these can be thin or fragile outcrops of material whose broken shapes will be visible in the appliances, usually meaning a do-over. Not a welcome prospect.
Anyone who has made a number of moulds will certainly have come across this phenomenon and hindsight is 20/20 so there are a number of strategies exist to deal with them.
Solutions to the problem
Silicone
Naturally, the easiest is to make moulds of everything in silicone which can be soft enough to bend where rigid materials would break. This may seem like a logical answer and it may indeed solve some problems, but let’s not be so prescriptive about that.
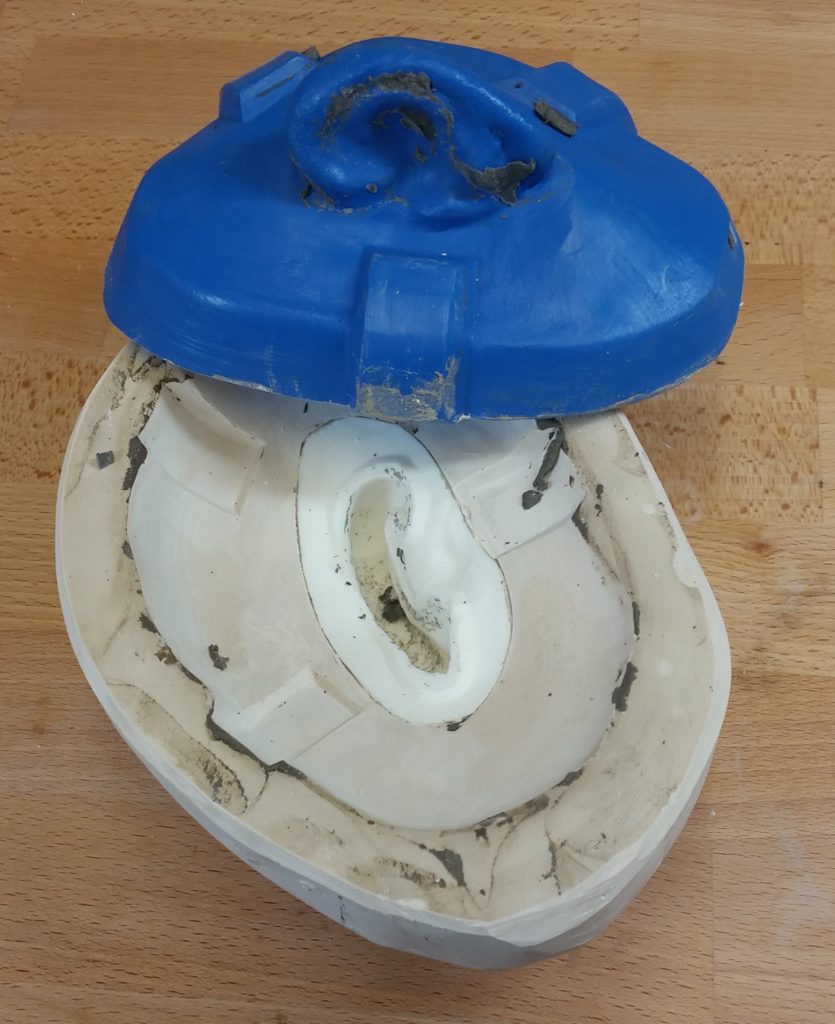
Ears are notoriously undercut with their many curves and indented negative shapes. Filling these in and remoulding them as simplified shapes helped make these ears pieces work well, especially with a silicone negative.
For one thing, silicone is expensive and often needs a supporting jacket to keep it in shape so it adds time, expense and possibly size to a mould – which if totally necessary is worthwhile. However, if something can be made quicker, cheaper, lighter and smaller without silicone then it isn’t a terrible idea to do so.
Possibly a silicone mould won’t work, as the piece in question may need to a rigid mould such as when casting latex pieces – plaster is used to cast latex because it is porous and absorbs the water in the latex – silicone moulds are waterproof and make casting latex pieces much trickier.
Also, it isn’t just about being able to open the moulds, it’s also about getting a mould to close without touching. The majority of silicone appliances need mould surfaces to be prepared with an encapsulant of some kind.
If parts of the mould smudge past each other on closing, you could damage that delicate surface and not know until you’ve gone through the process of running that appliance. Not until that material has cured and the mould opened will you know whether or not that mould is doomed to fail the same way every time.
Multi-piece moulds
Another is to make a mould in more than one piece to allow those pieces to be opened in different directions. This is often a tactic used, sometimes if there isn’t a major undercut because it simply makes it much easier to open the mould. The trade-off is that a seamline is inevitably created, (although a good mould will yield a thin seam which is of no major consequence).
It may be that a tight fitting or large mould requires a lot of pulling and prising to open, and these stresses on moulds can cause unwanted damage (especially if many casts are required from the mould), making a thin seam a fair price to pay for a much easier opening experience.
This is where good mould-making is a great asset in a work pipeline where multiple casts need extensive seaming. A good mould yields pieces which are easier to repair and so have a real dollar value in the long run.
Change the sculpt
Another is to sculpt in such a way so as to cover undercuts with the soft sculpting material. If making appliances then the pieces will likely be made in a soft material like a silicone gel or foam latex. Assuming the undercuts which are covered with sufficient thickness of plastiline cover the undercuts then the resulting appliances will also be soft enough to flex around any undercuts and there’ll likely be no problem.
Sometimes a sculpt is modified in order to address undercuts, and if increasing a thickness here or extending an edge there or cutting something back doesn’t compromise the design too much then it’s a perfectly sensible way of fixing that issue.
Also, any cutting edge or overflow clay which is laid down can fix the same issues – the thickness of the clay laid down can cover minor undercuts just the same as a sculpt. The principle remains the same – the mould doesn’t get to meet the cores surface at a point where an undercut would be created.
Modify the core
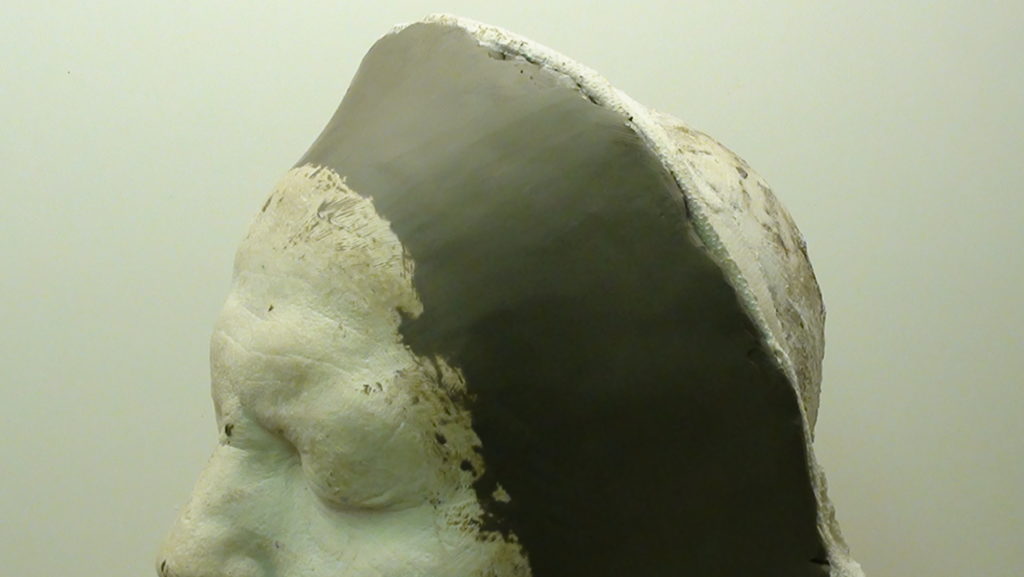
Finally, and possibly my favourite, is to fix the core before sculpting begins. This may involve taking a tool to scrape away the plaster on overhanging eyelids extended to the weight of casting material used during the original lifecast.
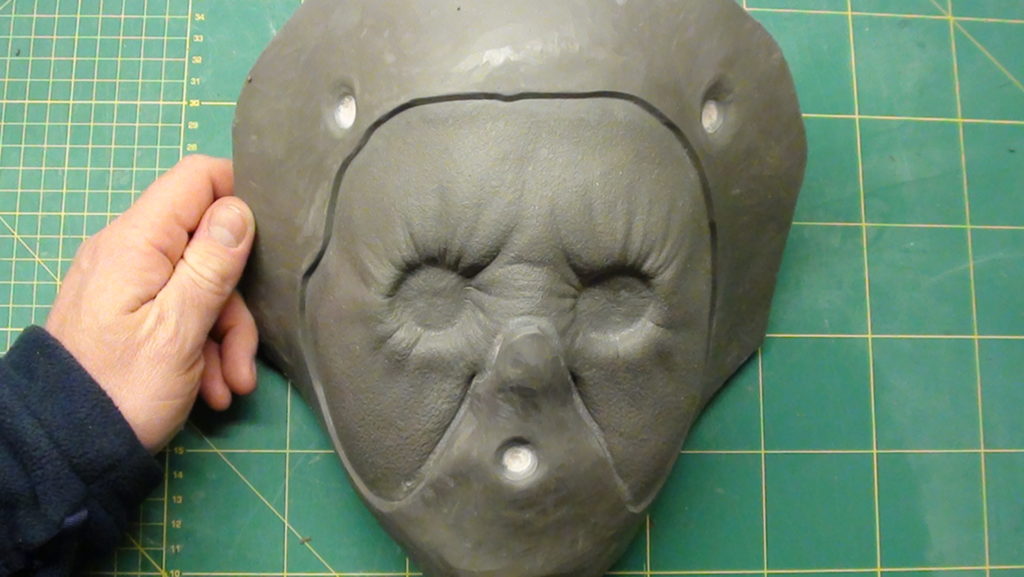
It may involve filling in nostrils with clay, flaring out necks or extending sections in order to provide a flat and smooth area to put keys, bolt holes, touchdowns, pry points or whatever else may be necessary to make a mould work well yet would otherwise be tucked around the back of a shape and would make opening tricky.
Clay added to the plaster original creates a flared out area. Mould this to cast out duplicates with a flat area built in to place keys, overflow and pry areas later.
This is often a great way of taking the problem away early on (although admittedly at more time and expense as a mould is then usually required of this modified version) as the mould is then made purposefully from the outset to function at its most efficient.
Being able to get a piece out of a mould easily is a great feeling when THAT part of the process is at the tail end of a job when time is at its least available.
I’d rather over-engineer a core and make a piece fall out of the mould than rush through things and be praying every time it came to open the mould.
Usually, the solution is a mixture of these techniques, depending on what you have most of – time, money or nerve.
Have you had any howler undercuts in moulds? Have a cautionary tale? Let us know and we can feature them in a post! Email us at stuartandtodd@gmail.com!
Happy Moulding!
-Stuart
I am here Stuart. I love the way you teach….. and I am not going give up. Thank You.
I really liked this blog. The topic was covered thoroughly and the information was formatted in a way that was easy to read. A great resource which will help minimize a costly, & time-consuming trial and error process!
Many thanks Stuart, these tutorials are always helpful, clear and instructive.
I have a question and perhaps a request; I have to take a mould from a skull (a real one), and there are so many voids, thin bits etc etc, and its also fragile.
What do you think of a thin glove of T20 silicone, backed up with a stiffer layer of T30 and a plaster m/m? Or even an intermediate backup of flexible foam to support the delicate glove mould?
Love a tutorial on this or similar.
Muito obrigado por compartilhar!parabéns!
I’m still trying to understand this part of the process. Undercuts, keys, etc. Do you have a video showing everything? It helps me to see what is being discussed.