
Fibreglassing done. Did I green trim it…ummmm. Nope.
Fool that I am, I missed my green trim window so I let the fellas set up overnight, and took a hacksaw to the edges.
It took about twenty minutes with a new blade (one with 21 teeth per inch, so not too fine) and a lit of sandpaper and we are ready to pop this baby open…once the 6mm bolt holes are drilled, of course.
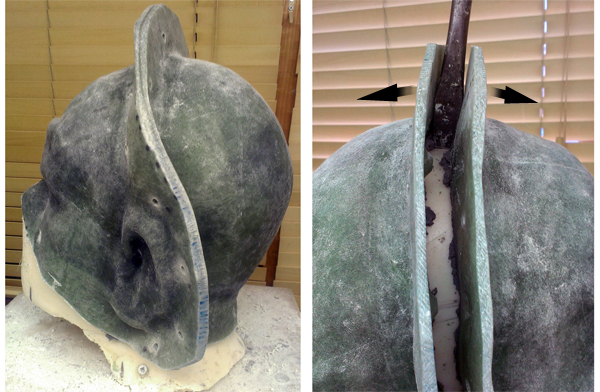
The finished mould, left, after trimming, drilling and a wee bit of sanding.
Then, gently prying the mould apart with the mahoosive screwdriver.
Using my massive screwdriver I keep for just such occasions, I pry the two halves apart easily. The plastiline sticks mainly to the mould, making it quite easy to scrape and clean up the core.
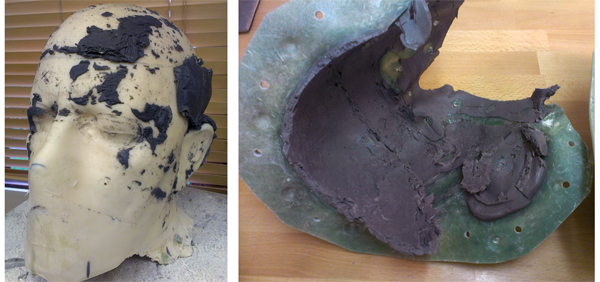
The core and the front half after opening.
You can see how the plastiline has favoured the mould, and almost come away clean from the core.
The plastiline which easily pulls out of the fibreglass is kept and can be reused. For now I keep it somewhere close by as I need to use this volume to estimate the amount of silicone I will need to fill this mould up later.
The plastiline left behind is carefully scraped out using a wooden tool, and then I use panel wipe (naphtha) to dissolve and scrub out the residue. All in all it tool about 45 mins to clean this mould out.
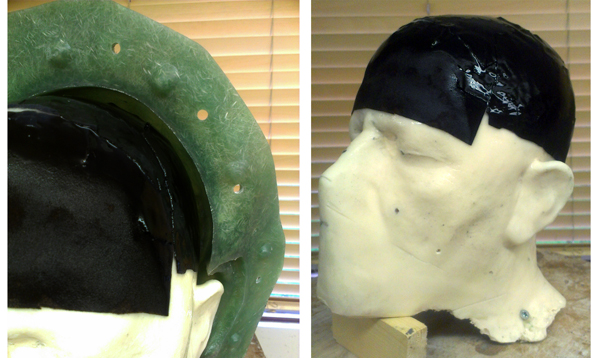
I also need to put an injection point in the mould. The core is too thick and difficult to get into so I opt to have the injection point in the back of the head where I intend to have hair. I make a plunger and tube sing resin and some waste water pipe from a plumber supplies. (For details on making syringes, check this post with video here).
With Lycra cap, this gangsta is ready to be poured up.
You can see there is plenty of clearance between the core and the mould.
I think it is a good idea to reinforce the silicone on the inside, to help it keep it’s shape and durability as this appliance will be used more than once. I have only got a dark brown Lycra fabric in the workshop, and time/budgets being what they are, that is what I am going to use.
I stipple a layer of the silicone on, and then use a sponge to smear more on the outside. The Lycra, although stretchy, does want to buckle and create bumps in places where it can’t bend around the curves. I trim little darts into it with scissors hear and there to help it sit better. It isn’t perfect, but it will hopefully do the trick.
You can see in the pic above that there is a decent clearance between the real head and the mould. That is naturally the void left from where the sculpt was, and being thick makes it easy to accommodate any Lycra underneath. If it did touch down on the mould surface anywhere, then you would see a dark patch on the appliance. Lets hope that doesn’t happen.
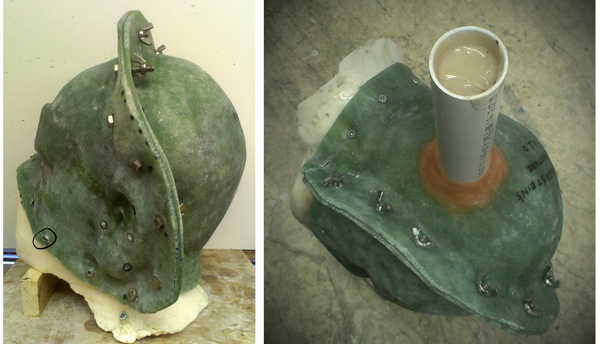
The mould is assembled, ready to pour. The mould is attached to the core using small posidrive/crosshead screws rather than bolts which is usual.
The final poured head…now we wait!
Once the Lycra is secured and the silicone has set up, I assemble the mould and screw the glass mould to the resin core. Usually I use bolts here, but because the core was made without any filler in the resin, it is too thick in some places for the bolts to come through.
The mould is then bolted and tightened around the edges, and the pour tube is placed. I mix up 1200g of silicone, which looks about the right volume with enough to spare for leaks/spills and pour tube. I will have a better idea after this as to how much I need – better to mix a bit more than you need than to have a bit less.
The silicone finds it’s way everywhere without the need for the plunger, so I sit this fella to one side and leave it for a couple of hours to check the result. I will update you as soon as possible!
Regards
Stuart