
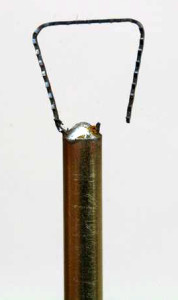
 Loop tools are a delight to make and use, and some of the daintier ones are cared for like beloved pets. Sometimes though, either through careless stowing or lending to a clumsy colleague we end up with a broken loop which causes distress and sadness.

I know because its happened to me enough times so I thought I would share with you a way of successfully restoring a busted loop to it’s original glory, and reduce the likelihood of recurrence too.
One note: this repair depends on the loop breaking at the base where it joins the handle – if the loop breaks in the middle then I think replacing the actual loop itself is the best option, or making a new tool from scratch. If so inclined then check out my tutorials on making loops and wooden tools.
Download a handy PDF of this with pics here.
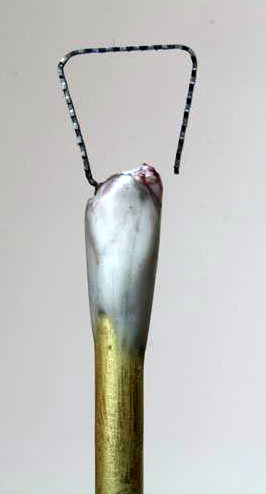
The hero who saves the day is epoxy putty – a two part putty mixed together in equal amounts and placed on the break. It sets up hard and will secure the loop end in place, supporting it well and reducing the chance of it breaking again.
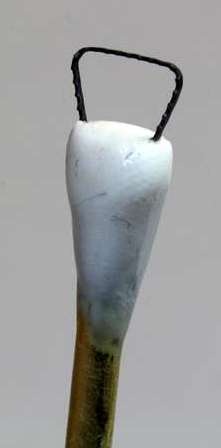
Often it is just the amount of leverage placed on that tender stem which causes it to break, and soldering may cause the metal to weaken too. In any event, the first thing to do is clean the affected area with a wire brush or abrasive cloth.
Mix up a tiny amount of the putty – ensure you have equal amounts of the two components. You’ll need less than a pea-sized lump in total.
It’s well worth wearing disposable gloved when handling it as I have here, as you’ll want to avoid getting epoxy putty on the skin – check the packaging for safe use recommendations.
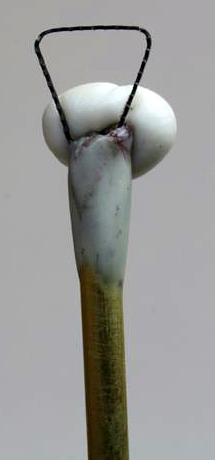
Sometimes the loop is happy to stay in place, but sometimes the spring in the loop causes the errant end to stand out and refuse to sit within the confines of the handle. Fear not, as such an inconvenience is not long to suffer.
If you have an errant end such as this, then you’ll need to do this in two hits. This first hit involves creating a small lip to hold the loop in place when it eventually sets. Then, when that is done you can hit it with round two.
Round 1:
It’s best to surround the handle near the loop with a small amount of he putty and massage it around to create a thin shroud. Water is a curiously sufficient solvent which allows you to smooth the finish with fingers alone. Use a small tool to pull and pick a small lip to later hold that prong in place.
Putties vary in setting times, and typically the slower they take to set the stronger they are, so weigh up your requirements. I would ideally leave this to harden up overnight.
Round 2:
 Now that the putty has set rigid, the loose prong should be able to be directed to sit in the lip you made allowing you to add a second mix of putty carefully to surround and hold the prongs firmly up their base. The putty should chemically bond to itself and create a firm sleeve to hold the loop base.
I put the blob on one side and gently push it through, smoothing and massaging it around evenly with water and a small tool. You could sand this smoother later once it has set if you like, but I like to get the smooth finish now.
 Put this to one side and allow it to set up again overnight before using. You broke this thing once already… For crying out loud, give the fella a chance.
All being well the putty is set rigid and will hold the loop in place handsomely.
I actually think it’s a worthwhile exercise to pre-empt the tragedy awaiting such delicate loop tools and do this on the thin stems before use to head that damage off at the pass.
Doing so should ensure years of break-free sculpting.
-Stuart