
Colour theory is a crucial part of makeup, especially if you are in the business of trying make a portion of the face out of rubber and make it look like it belongs there and is the same as the real skin which surrounds it.
This is especially true when mixing your skin tone into your appliance material in the case of silicone or gelatine appliances.

This post is going to give an overview of the article we wrote for Neill Gorton’s Prosthetics magazine #3.
The materials are different, but the principles of colour theory and how to create skin tones remain the same. This colour is IN the pieces rather than ON them.
We have gone on a fair bit in the past about the importance of colour and colour theory in posts about using photoshop to match skin tones, and 7 tips for painting skin tones. The reason…? Because it really matters and it’s actually rather simple.
Check out the podcast in iTunes or Soundcloud
and the video further down – there’s a loooooot here!

The latest episode of our podcast ‘Battles With Bits Of Rubber’ deals with this issue of colour theory! Check it out and subscribe on iTunes , Soundcloud your podcast app or directory of choice!
Base Skin Tone
It’s important to get the base tone of your appliances right, as you don’t want to make things harder for yourself later by creating an appliance which fights you all the way because of poor base tinting.
It’s very frustrating to have to use the makeup to ‘correct’ a badly or inappropriately coloured appliance when you can get the base tone to do most of the work for you.
What exactly do we mean by a ‘base’ tone? The base tone is also known as the foundation tone. It’s the main ingredient, the support layer so to speak, to which other things – in this case, colours – are added to make something: a believable skin colour.
Translucent materials like silicone and gelatine are coloured intrinsically – that is the colour is mixed into the material itself rather than applied onto the surface. We’ll do that later when we apply, but the ideal situation is to have as little to do in the makeup chair as possible.
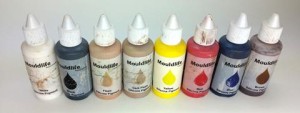
Pigment
There are a number of products you can use to actually pigment the silicone base you’re colouring – such as oil paints and artist’s acrylic paint (yup, Todd tried this and it works!!), but by far the most reliable are silicone pigments.
These highly concentrated colours are designed to mix well with both condensation and addition cure silicones, and don’t affect the chemistry of the silicone setting, which some oil paints and acrylics may, for example.
(You should always do some testing before mixing a large batch of silicone with an untried colouring method.)
Silicone pigments are usually available from wherever you buy your silicone, and the concentrated pigments are usually very good value for money as a little goes a long way. Canadian company FuseFX, developed by the late and highly regarded Guy Louis-XVI offers a wonderful assortment of silicone pigments and paints, as do Mouldlife in the UK, and Tom McLaughlin’s Silicone Art Materials in the US.
You can also use foundation makeup such as MAC, Makeup Forever or even L’Oreal for that matter, but honestly, these are likely to work out more to be expensive than the pure silicone pigments. The amount of marketing, packaging and regulatory hoops they have to jump through to be available on a store shelf makes it an expensive alternative.
Light is rather important!
Usually, it’s better to match the base to the palest areas of the skin you are trying to match. You can usually darken larger areas of a paler base with makeup during application more successfully and easily than highlighting larger areas of a base which is too dark.

The same mixed colour in three different lighting situations appears different – the final pic is in natural daylight.
We recommend you start by taking some clear pictures in good natural daylight of your model’s skin, if possible. That way you can analyse the colours and determine what colours you need to match when mixing. Ideally, you would mix with your model present so you can offer up and compare, but this obviously isn’t always going to be a possible or realistic option.
We also recommend that you mix using daylight as your light source if possible, preferably near a window or a lamp with daylight bulbs. Moving around and comparing the effect under different light sources will also help you find the right tone. This mix viewed in three different lights shows the effect of light sources on colour.
Mixing
Start by adding a small amount at a time, and then mix carefully to ensure that it isn’t too much. If too much pigment is added, it will become overly opaque and you will lose the benefit of having a translucent material!
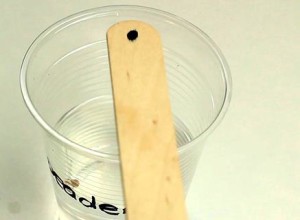
To check the opacity, use a pale mixing stick and place a black dot using a Sharpie pen near the end of the stick – this will then display quite readily how the opacity is changing as you add more pigment.
If the dot is really easy to see – add more pigment; the dot should just be visible through the pigmented silicone.
We both attribute Neill Gorton with sharing this invaluable tip! Thanks, Neill!
Colour Theory In Practice
With regards to mixing a base colour, you are going to be using colour theory essentially to ‘correct’ the pigments. Whatever you’ve got in that pot is unlikely to be the same shade as the skin you’re trying to match, so get incrementally closer a bit at a time. You’ll find the pigments you have will vary from manufacturer to manufacturer so you will essentially be steering the colour gradually by eye.
Looking at your base and comparing it side-by-side to your model’s skin, ask yourself in very basic terms, ‘What is missing?’ Is it too pale, or too dark? Is it red enough? Yellow enough? Green enough? You basically will be using colour theory to adjust the base tone until it is as close as time allows.

A pin used to put the tiniest amount of blue into a mix without causing drastic errors!
If you need to add tiny bits of primary colours, it often helps to decant a small quantity of that colour onto a surface and use a thin tool such as a pin or toothpick to drop a small amount into the base, rather than drop it straight from the pigment container.
The smallest drip from a dispenser nozzle may still deliver way too much and ruin the whole mix.

Flocking is tiny fibres of nylon or rayon, available in different colours and lengths.
Alternatively use flocking instead – small amounts of blue and green are especially effective when added as flocking, as pigment strength may vary from batch to batch whereas flocking is easier to judge.
Sample Mix
If you are not sure which way to go with a colour, and you find yourself confounded as to which direction to go, simply drop a small dollop of the base coloured silicone onto a clean white mixing palette and drop a tiny amount of each pigment at intervals around the outer edge.

Drag some of the base out to it and mix it lightly to see what effect each pigment has on the base as it currently stands.
This will show you, in a small and less upsetting way, what effect green, blue or yellow will have on your mixture.
It should help you decide which way to go, and you may be surprised at what colours actually help. A tiny drop of black for example helps mute the brightness without darkening the mix too much.
So, go slow and steady, refer to reference of the colour you want to arrive at and then get closer one step at a time!
So, want to watch me put all this into practice and actually mix some silicone into three different skin shades? Alrighty then….
And for all you podcast freaks (…like me… I am a podcast addict!):
Leave a comment below! We love questions and podcast subscribers too!
email us direct at stuartandtodd@gmail.com
Thanks
Stuart & Todd
I am technologist orthosis and prosthesis in Brazil, want to make prosthesis for partial amputation of hand and foot among others, but here is not going to do this, I know that in Europe and America have but are very expensive to me, I wanted to know if they can help me that my project, any hint will be welcome, grateful.
There is a huge clinical background involved, so often the people who make the pieces are not necessarily going to b involved with the patient interaction. Try getting in touch with different Orthotic & Prosthetic Practitioner associations. This may be a start lead:
http://www.opcareers.org/professionals/practitioners/
Thank you , once again, for sharing hard earned knowledge . I am most grateful for making it so easy to learn.
This is fantastic. Thanks for producing this wonderful learning material.
Many thanks Stuart, informative and thorough as always